emacs使用ditaa绘图

use emacs to draw ditaa with ascii code.

ditaa使用和介绍

ditaa是一种基于java的类似plantuml但是更轻量级的绘图工具,其基于ascii码,有浓重的geek 风格,很适合喜欢这种风格的人使用,对于文档架构等地方也可以很方便的且很低调的引用。 你还可以在artist-mode下使用figlet生成好玩的字符,比如通过 M-x artist-mode C-c C-a t然后按下回车,根据提示选择banner3,即可生成如下字符,哈哈

1
2
3
4
5
6
7
##       #### ##    ## ##     ## ##     ##
##        ##  ###   ## ##     ##  ##   ##
##        ##  ####  ## ##     ##   ## ##
##        ##  ## ## ## ##     ##    ###
##        ##  ##  #### ##     ##   ## ##
##        ##  ##   ### ##     ##  ##   ##
######## #### ##    ##  #######  ##     ##

ditaa文档

ditaa的官方文档很简单,不妨花一点时间看一下

ditaa安装

1
2
3
4
# debian系
sudo apt-get install ditaa -y
# mac
brew install ditaa

org设置

1
2
3
4
5
6
7
  (with-eval-after-load 'org
  (org-babel-do-load-languages
  'org-babel-load-languages
  `((ditaa . t))))
  (setq org-ditaa-jar-path (expand-file-name "/usr/share/ditaa/ditaa.jar"))
  ;;如果是mac
  (setq org-ditaa-jar-path (expand-file-name "/usr/local/Cellar/ditaa/0.11.0_1/libexec/ditaa-0.11.0-standalone.jar")

注意如果是mac需要java下载

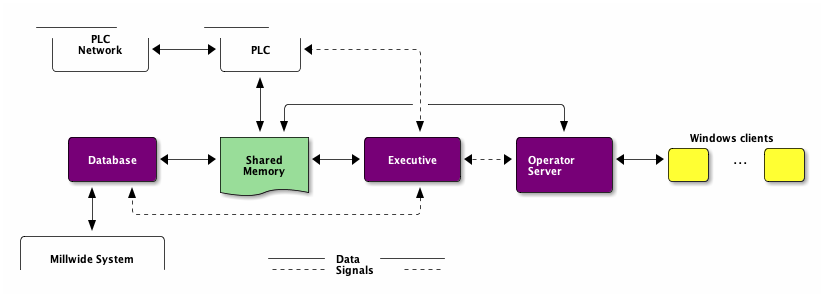
测试ditaa(来源网上示例)1

记得在代码段内执行C-c C-c即可执行代码段,调用jar生成png

 1
 2
 3
 4
 5
 6
 7
 8
 9
10
11
12
13
14
15
16
17
18
19
20
21
22
23
    +-----------+        +---------+
    |    PLC    |        |         |
    |  Network  +<------>+   PLC   +<---=---------+
    |    cRED   |        |  c707   |              |
    +-----------+        +----+----+              |
                              ^                   |
                              |                   |
                              |  +----------------|-----------------+
                              |  |                |                 |
                              v  v                v                 v
      +----------+       +----+--+--+      +-------+---+      +-----+-----+       Windows clients
      |          |       |          |      |           |      |           |      +----+      +----+
      | Database +<----->+  Shared  +<---->+ Executive +<-=-->+ Operator  +<---->|cYEL| . . .|cYEL|
      |   c707   |       |  Memory  |      |   c707    |      | Server    |      |    |      |    |
      +--+----+--+       |{d} cGRE  |      +------+----+      |   c707    |      +----+      +----+
         ^    ^          +----------+             ^           +-------+---+
         |    |                                   |
         |    +--------=--------------------------+
         v
+--------+--------+
|                 |
| Millwide System |            -------- Data ---------
| cBLU            |            --=----- Signals ---=--

../../images/ditaa-first.png◎ ../../images/ditaa-first.png

ascii字符的意义

具体请看官网不再赘述http://ditaa.sourceforge.net/

怎么画写这些字符(ascii码字符)

请参考mode(artist-mode) 任意文档打开,然后M-x artist-mode C-h m选中Artist,Enter进入帮助文档, 这里要说明下,如果通过ssh 虚拟机,然后emacsclient是不行的,因为鼠标识别不一样 会识别成windows中的鼠标单机等操作 如果没时间看文档可以进行鼠标操作,鼠标操作是单机中间滚轮等对应操作 当然我不建议鼠标操作,离开键盘会很麻烦, 那具体如何开始呢,慢慢说来

如何开始

  • 我建议随意打开一个org新文件,里面直接M-x artist-mode开始就好,不选择scratch是很多人有奇怪的选项
  • 然后记得M-x display-line-numbers-mode打开这个mode,在非artist-mode下,按Ret到多行,

因为如果你一行也没有是无法C-n下面拉长的

画一个rectangle
  • C-c C-a C-o选择rectangle画笔
  • 此时按下Ret, 然后鼠标开始移动(C-b C-n C-p C-f等cursor移送就好)
  • C-c C-a C-o切到text画笔(其实不选也可以),然后输入想要输入的字符串
  • 画完大概是这个样子
1
2
3
4
5
                                       +-------------------+
                                       |                   |
                                       |    Nginx          |
                                       |                   |
                                       +-------------------+
  • 同理就可以绘制出backend1 backend2
 1
 2
 3
 4
 5
 6
 7
 8
 9
10
11
12
13

                                       +-------------------+
                                       |                   |
                                       |    Nginx          |
                                       |                   |
                                       +-------------------+


              +-------------+                                          +------------+
              |             |                                          |            |
              |   backend1  |                                          |   backend2 |
              |             |                                          |            |
              +-------------+                                          +------------+
  • C-c C-a C-o选择line 到线的中间位置按下Ret,变成+,开始走位,然后到结尾,按下Ret,拐弯就是拐弯的地方按下

Ret

 1
 2
 3
 4
 5
 6
 7
 8
 9
10
11
12
                                       +-------------------+
                                       |                   |
                      +----------------+    Nginx          +-----------------+
                      |                |                   |                 |
                      |                +-------------------+                 |
                      |                                                      |
                      |                                                      |
              +-------+-----+                                          +-----+------+
              |             |                                          |            |
              |   backend1  |                                          |   backend2 |
              |             |                                          |            |
              +-------------+                                          +------------+

这个时候没有箭头等信息 可以先生成图片看看是啥样的,结束artist-mode然后首尾添加 怎么增加箭头呢?其实这里我不建议用命令或者啥的搞,如果基本就是<,>,^,v

                           +---------------+
                           |               |
                  +--------+     Nginx     +------------+
                  |        |               |            |
                  |        +---------------+            |
                  v                                     v
         +--------+--------+               +------------+---------+
         |                 |               |                      |
         |      backend1   |               |       backend2       |
         |                 |               |                      |
         +-----------------+               +----------------------+

../../images/ditaa-sencond-with-arrow.png◎ ../../images/ditaa-sencond-with-arrow.png

  • 设置颜色和类型

对每一个rectangle可以设置颜色和类型 常见的颜色官方已经演示,也足够用了

                           +---------------+
                           |               |
                  +--------+     Nginx     +------------+
                  |        |     cRED      |            |
                  |        +---------------+            |
                  v                                     v
         +--------+--------+               +------------+---------+
         |                 |               |                      |
         |      backend1   |               |       database       |
         |      {d}cBLU    |               |       {s}cGRE        |
         +-----------------+               +----------------------+
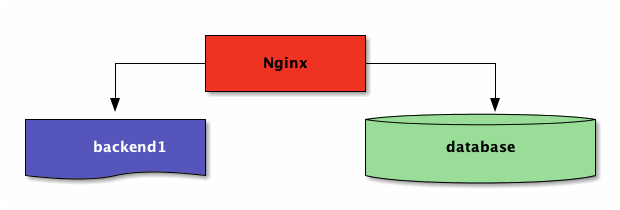
../../images/ditaa-second-with-arrow-and-color.png◎ ../../images/ditaa-second-with-arrow-and-color.png

总结

  • ditaa是很好玩的绘图工具,对于架构图,示意图等等都可以很方便用artist-mode等ascii码绘图工具辅助绘图
  • 相较于plantuml,ditaa在于小巧灵活,且低调有内涵