Kubernetes
Kubernetes
文档信息
个人环境搭建
minikube https://opensource.com/article/18/10/getting-started-minikube
minikube offical https://minikube.sigs.k8s.io/docs/
minikube
|
|
kubeadm安装
https://kubernetes.io/docs/setup/production-environment/tools/kubeadm/install-kubeadm/
三服务器
master1 2u2g slave0 1u2g slave1 1u2g
设置hosts
|
|
ssh免密略
安装docker 具体参考https://docs.docker.com/engine/install/debian/
批量运行
准备工作
|
|
添加源 add apt source list && install kubelet kubeadm kubectl
|
|
确认cgroup driver
具体参考 https://kubernetes.io/docs/tasks/administer-cluster/kubeadm/configure-cgroup-driver/
docker cgroup driver
|
|
k8s默认也是这个 先用这个测试
kubeadm初始化
按照指引即可https://kubernetes.io/docs/setup/production-environment/tools/kubeadm/create-cluster-kubeadm/
登录master1机器,执行kubeadm init
预检查
|
|
因为containerd默认禁止cri,这里去每个服务器执行下
|
|
估计没启动systemctl start containerd即可
containerd配置
如果不配置kubelet可能会来回重启 6443一直连不上
|
|
实际安装
|
|
执行里面的命令
|
|
初始化网络,增加cni配置文件
|
|
增加补全
|
|
从节点加入
|
|
最终ready了
|
|
kubectl命令相关
好用的选项
|
|
多用describe,了解缩写
|
|
配置kubectl自动完成
|
|
kubectl生成yaml
|
|
k8s集群信息查看
cluster-info查看集群信息
|
|
get componentstatus查看组件状态
|
|
查看pod
|
|
pod
https://kubernetes.io/docs/concepts/workloads/pods/
pod是k8s里面的一种workload, 是部署的最小单位,相当于逻辑主机。
pod里面的容器共享cgroup和network等namespace。
如何创建一个pod
命令行创建
yaml创建
官网 https://kubernetes.io/docs/concepts/workloads/pods/ 链接里面的simple-pod.yaml
|
|
我们执行下看看会有什么结果
|
|
这里我们看看对应的yaml
|
|
可以发现 第一行表明apiVersion: v1使用v1版本的kubernets的API
kind表示创建的资源类型是Pod
metadata表示名称命名空间,标签和关于容器的其他信息。
spec包含pod内容的实际说明,比如pod里面的容器,卷和其他数据。
status包含pod的当前信息,比如所处的状态,内部ip和其他信息。创建时候无 需提供。
这里可以用kubectl port-forward进行测试端口
|
|
打开另一个终端
|
|
Ctrl-C结束,检查 pod logs
|
|
pod标签管理
创建标签
|
|
在metadata添加labels即可,可以通过kubectl get pods –show-labels查看, 也可以通过kubectl get pods -L LABELNAME查看
|
|
修改标签
使用kubectl label pod POD LABEL=VALUE
|
|
过滤标签的pod
使用kubectl get pod -l LABEL=VALUE
|
|
这里注意 也可以写表达式 kubectl get pod -l '!env' # 没有env标签的 kubectl get po -l 'env notin (prod,devel)' # env不是prod和devel kubectl get po -l 'env in (prod,devel)' # env是prod或者devel kubectl get po -l 'env!=test' # env不是test
node添加标签
对于我们实际的工作节点,可能存在计算型,存储型,GPU型等,所以pod也希望 能够按照我们希望的调度到对应的节点上。
|
|
我们可以通过nodeSelector来选择节点
|
|
创建kubia-gpu
|
|
我们发现确实调度到了slave1
pod添加注解
|
|
我们可以使用kubectl annotate添加注解
|
|
CKA考前须知
https://docs.linuxfoundation.org/tc-docs/certification/tips-cka-and-ckad
https://www.qikqiak.com/post/k8s-cka-course/
Helm
helm是什么
使用
Argo
Argo官网 Open source tools for Kubernetes to run workflows, manage clusters, and do GitOps right. 目前看argo是包含多个产品的,这里面是argo workflow。关于argo project,更 多可以参考
Argo Workflow
argo workflow文档地址 https://argoproj.github.io/argo-workflows/ 可以通过如下文档安装一下 https://github.com/argoproj/argo-workflows/blob/master/docs/quick-start.md
install argo cli
https://github.com/argoproj/argo-workflows/releases/latest 找到最新的 版本
|
|
install argo controller and server
|
|
这里可以把type: ClusterIP改成type: NodePort
|
|
并且一定要注意proxy_pass https://xxx:xxx; 写https,否则会报错empty
如果你是minikube,就是minikube的ip
|
|
同样参考quickstart
|
|
执行这个跳过认证
最终安装好了
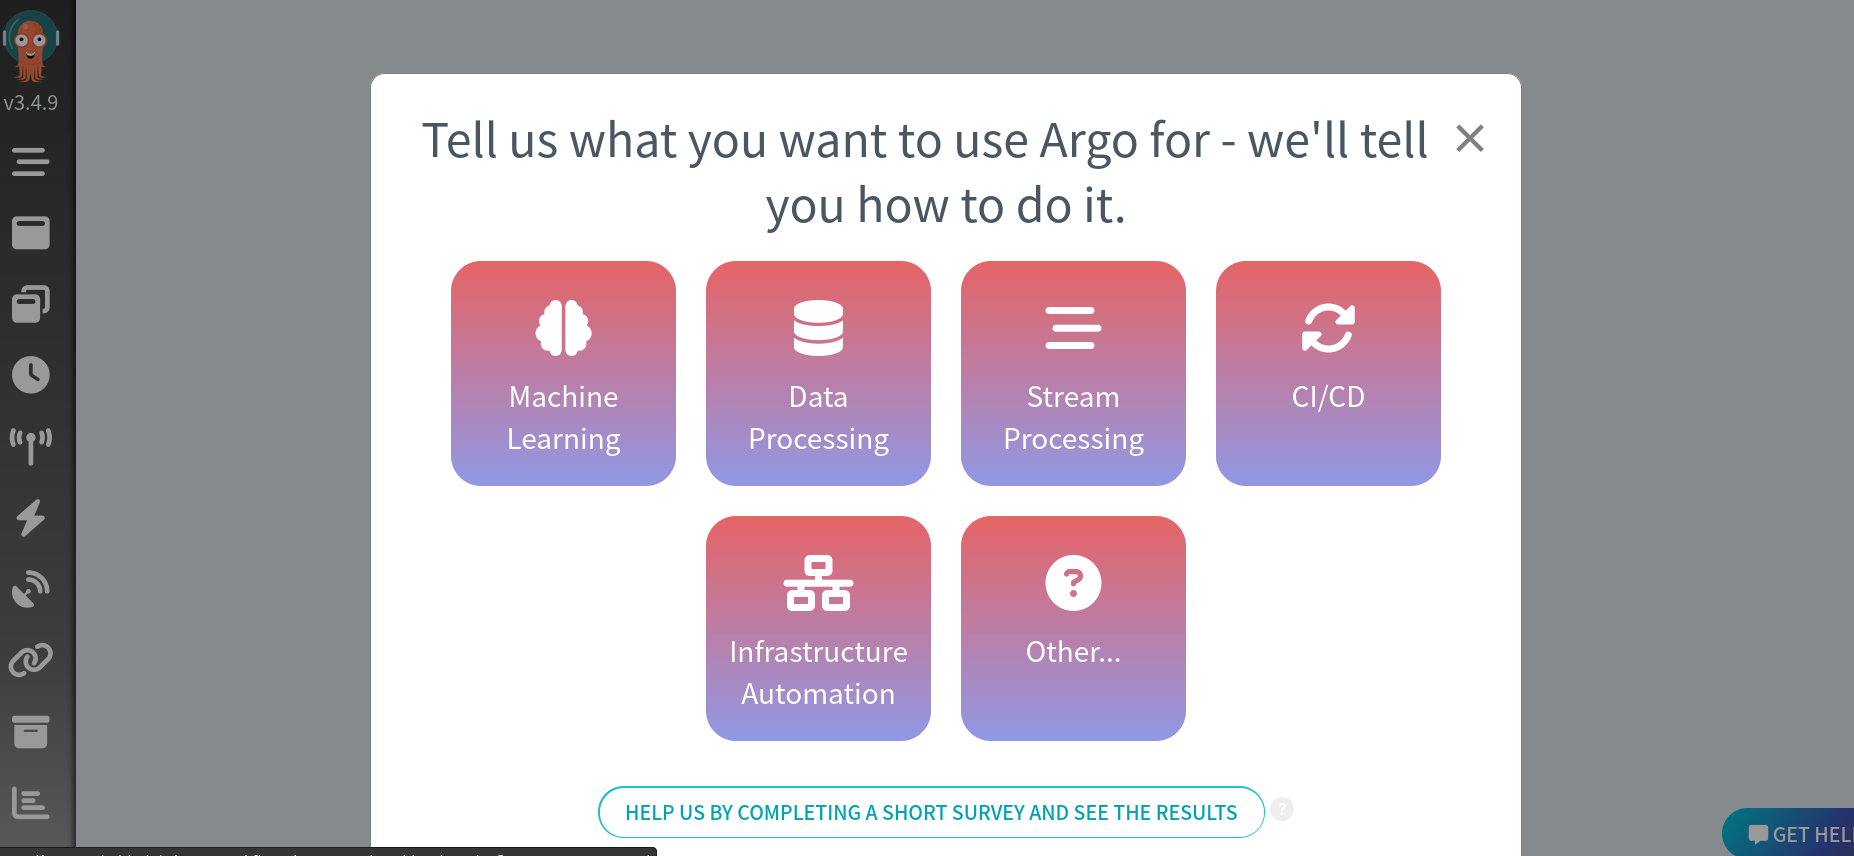 ◎ ../images/k8s/argo/argo-first.png
上面每个选择都对应一个文档,可以看看。
hello world example
更多的example 在这里 argo-workflow example链接
|
|
这个时候就会发现hello-world的argo workflow
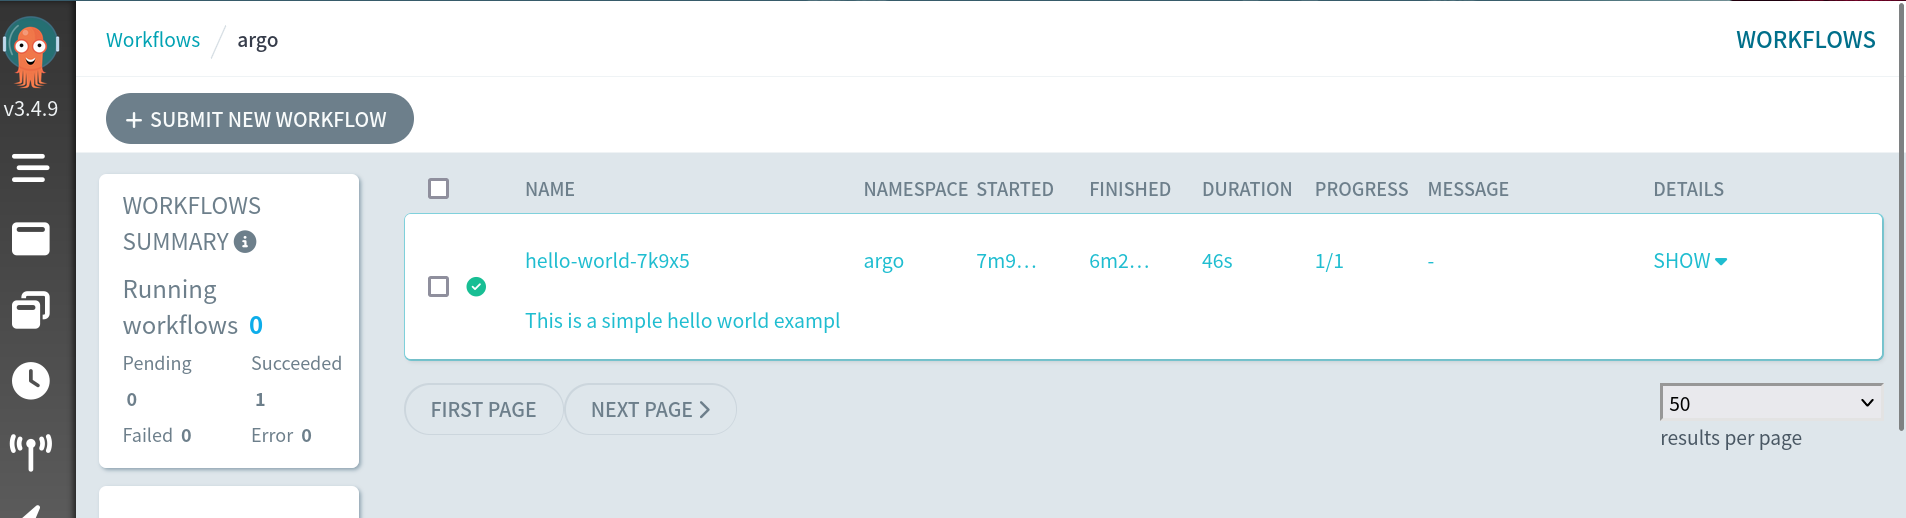 ◎ ../images/k8s/argo/argo-hello-world.png
我们命令行也可以看到对应的执行
|
|
GitOps and Kubernetes
本部分是为了了解kubernetes里面的ci/cd, 所记录的文档 书是2021年的。
 ◎ ../images/k8s/gitops/gitops-cover.png
备注
书里面的资源,可以先clone下来 https://github.com/gitopsbook/resources
|
|
环境要求
- Kubectl (v1.16 or later) 可以装一个minikube
- Minikube (v1.4 or later)
- Bash or the Windows Subsystem for Linux (WSL)
书的整体框架
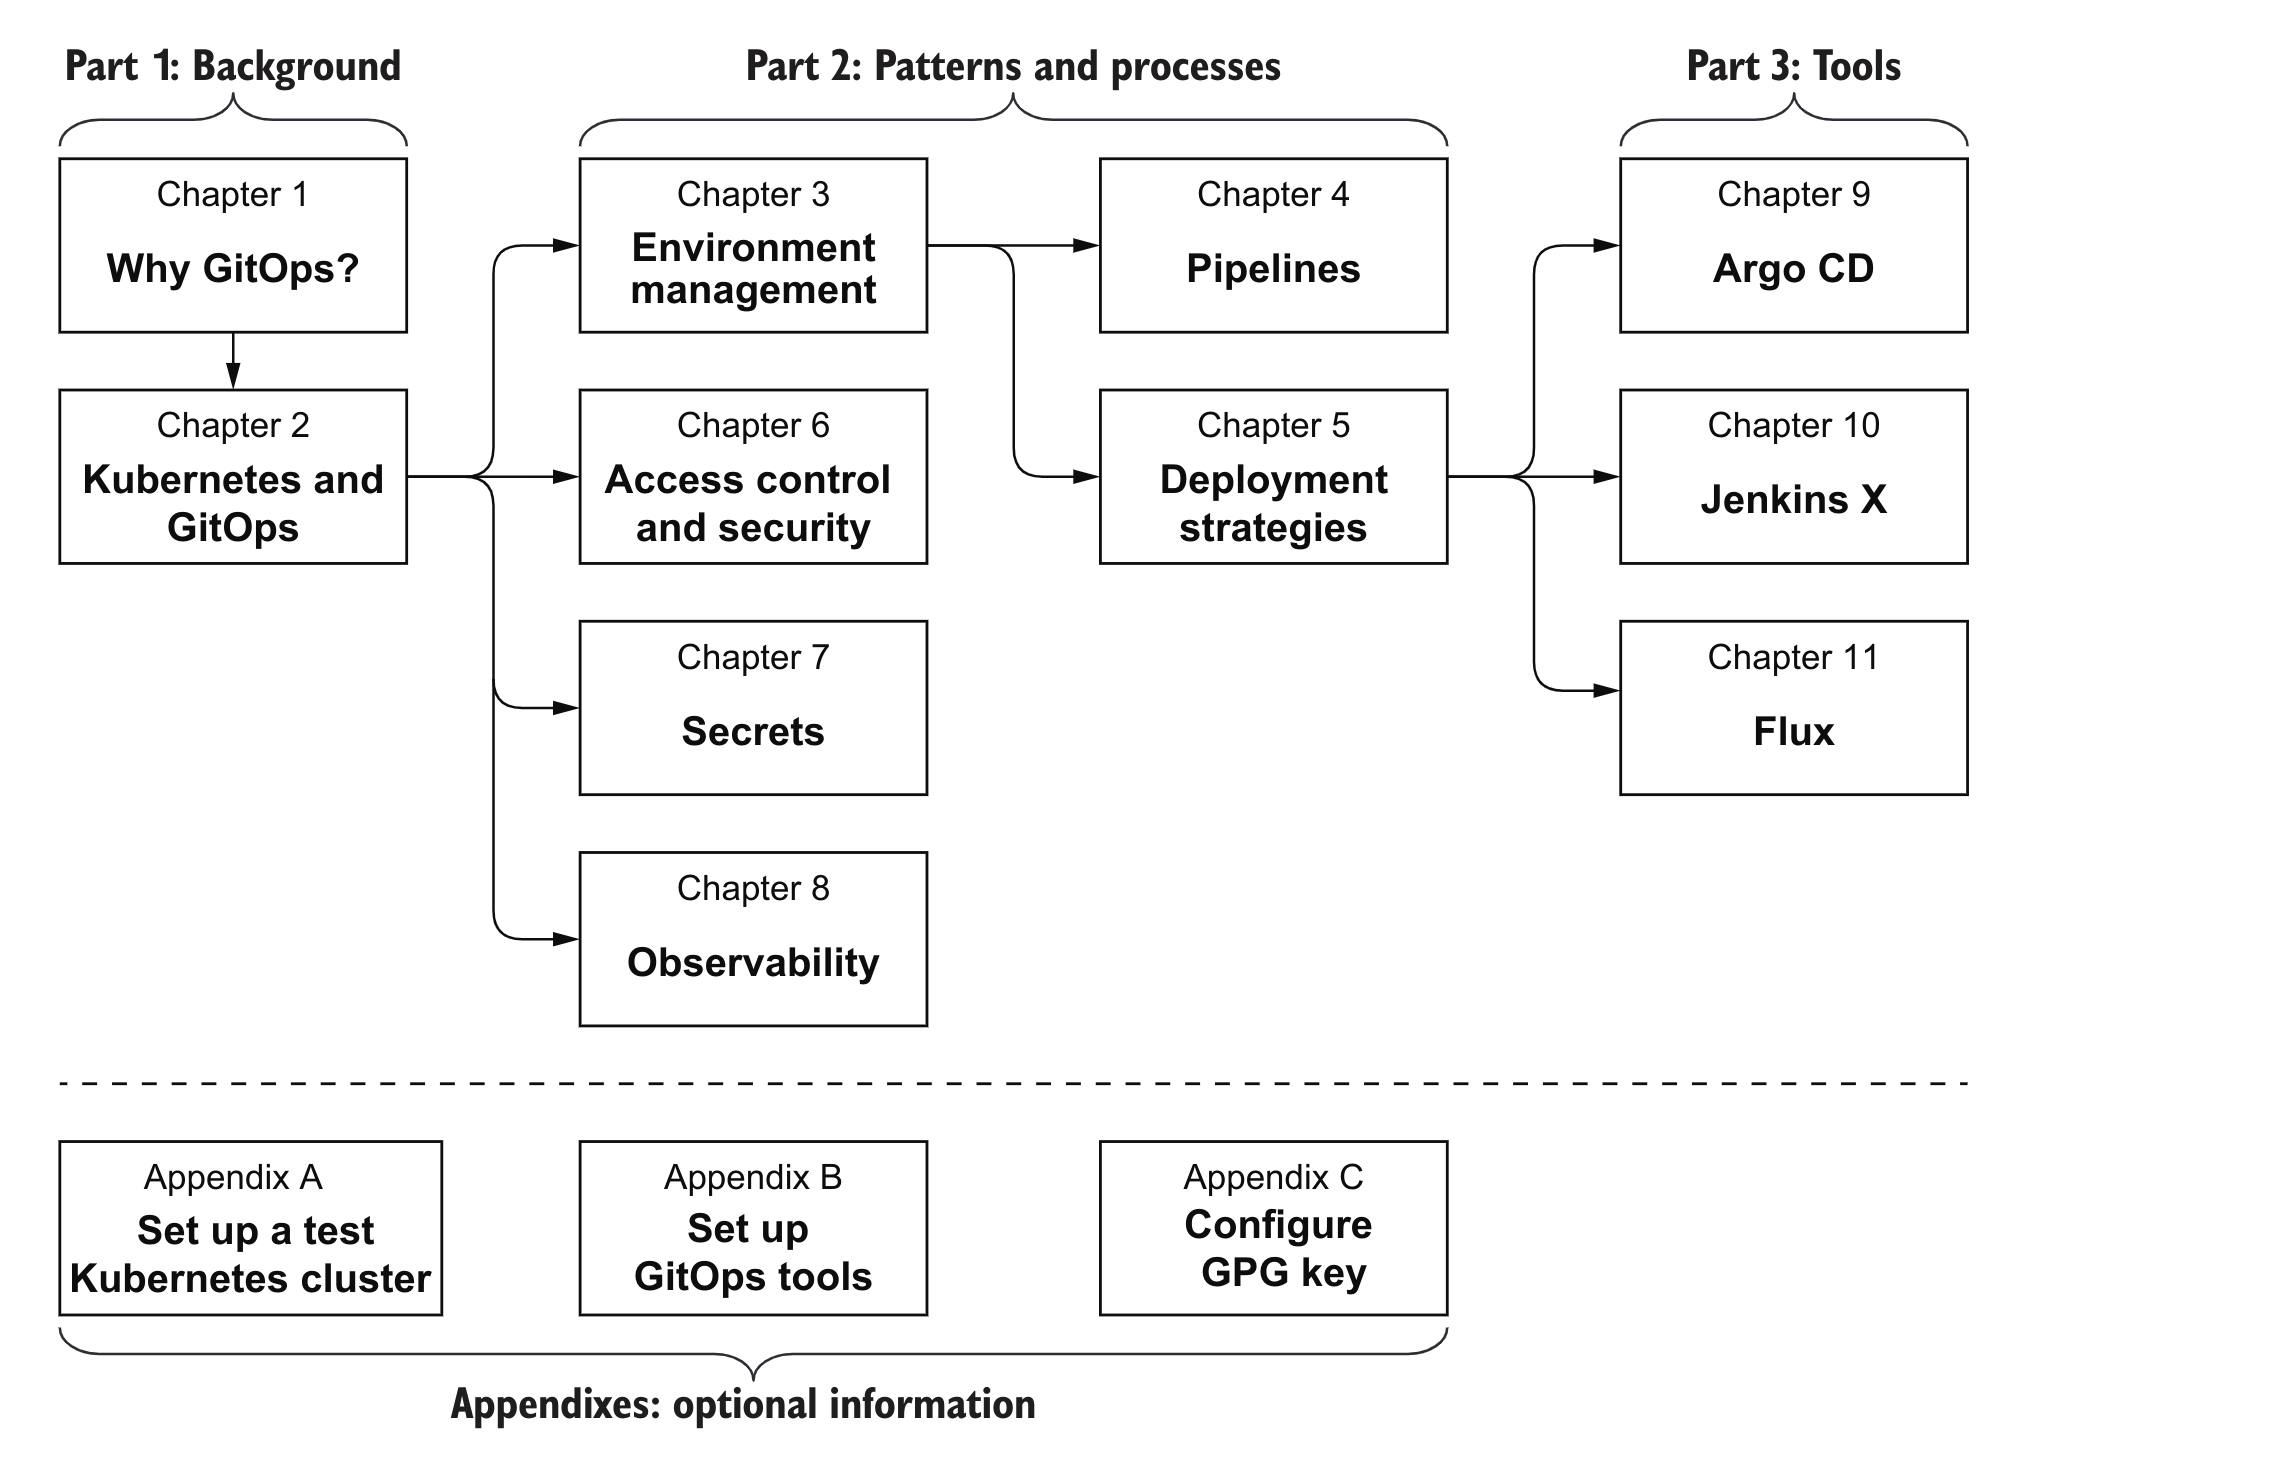 ◎ ../images/k8s/gitops/gitops-arch.png
Chapter1 Why GitOps
Gitops是什么
Infrastructure configuration and Software deployment, 书里面概述 gitops包含这两个,我觉得和传统ops的不同在于gitops定义了deploy的配置文 件并且把这个流程串起来了,而传统是生成版本,把版本给运维或者通过发布平 台进行发布。
而gitops里面你可以通过把这个版本release后,后面一切的资源准备,发布到 机器就按照定义好的pipeline跑起来了。
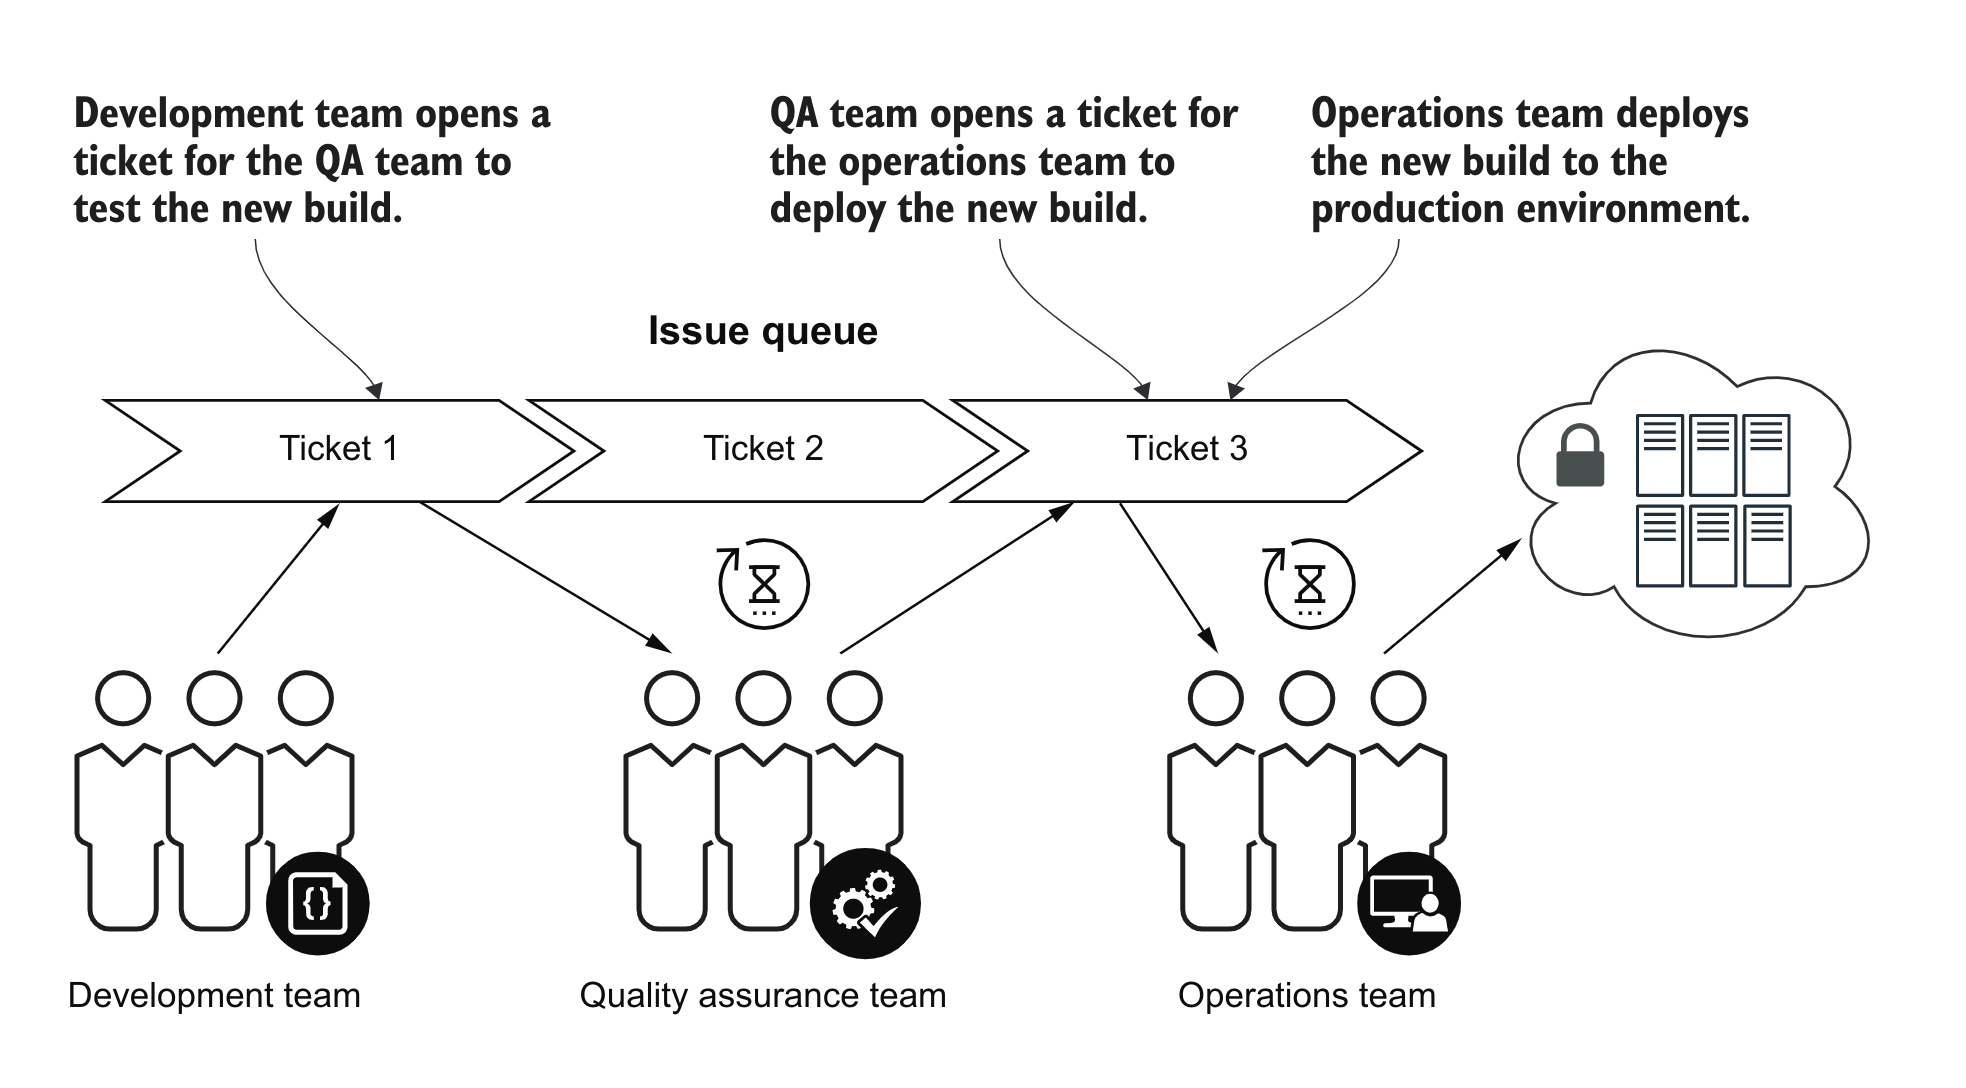
很明显的是在传统的CD逻辑里面,很多版本的更新是需要确认的,为了线上的稳
定性,并且需要注意版本不能发错,然后会有一些协同成本。每个团队包括QA,
CI, DEV, OPS各司其职。这样适合对于稳定性要求极高的,或者系统复杂度很高,
谨慎传统的团队。
 ◎ ../images/k8s/gitops/gitops-traditional.png
所以这样可能会导致发布频率低,因为每一次都需要沟通成本,一般通过ticket 进行流转,中间需要按照各自的流程进行运行,中间有问题也需要一定的时间成 本反馈。
DevOps是什么
DevOps是Dev和Ops两个单词组成,是一种理念,把CI和CD连起来,运维团队不再 需要参与代码的发布和部署,开发或者devops成员进行这部分的设计和分发。
DevOps的好处包含
- 开发和部署之间更好协同
- 提高产品质量
- 更多的发布和版本
- 减少提供新功能的发布时间
- 减少设计开发和运维成本
下图是书里面对比traditional和devops方式的运维方式
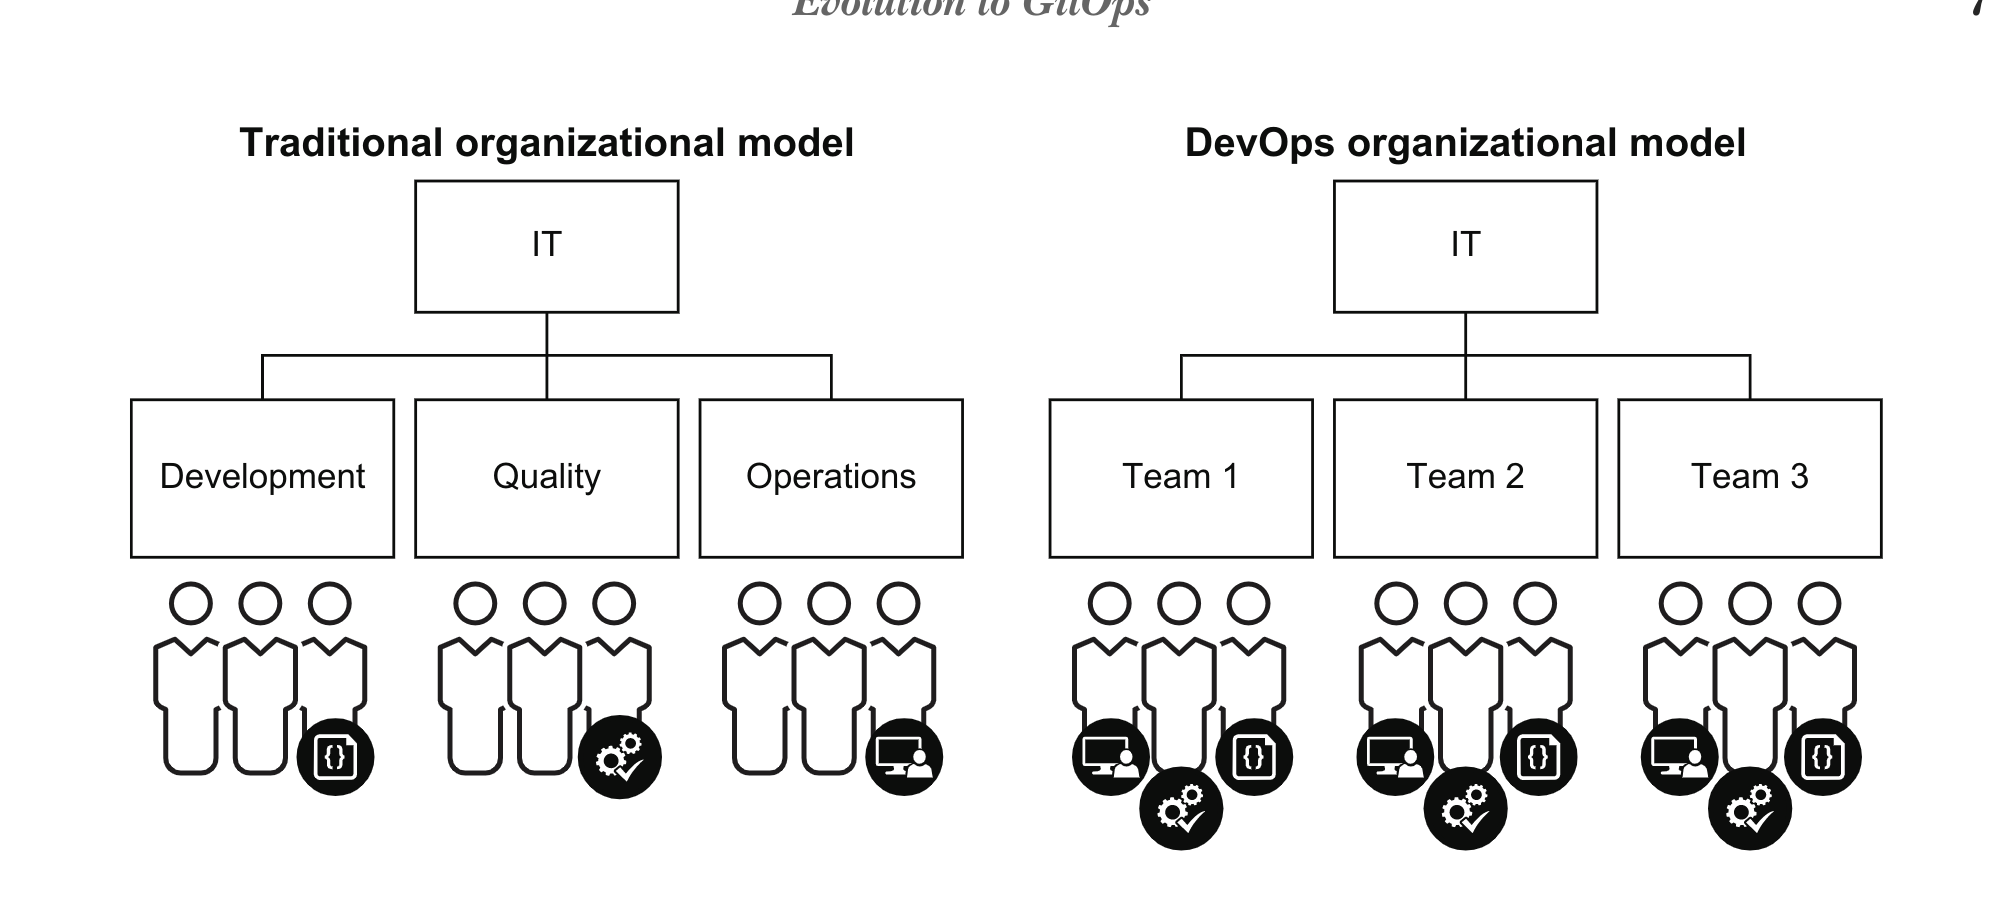 ◎ ../images/k8s/gitops/tradition-and-devops.png
可以发现团队变成小团队,这样方便模块化和分包,每个团队可以自己完成测试 发布等任务,减少耦合
书中认为gitops从属于devops,但是有自己的特性
- 对于容器化的管理监控和发布有最佳实践
- 以开发为中心,通过流水线管理开发和发布等操作
- 通过git跟踪代码和基础设施的变更
在理想的gitops里面,所有改变不应当是手动的,应当是通过对应模块负责人 review确认ok进行自动部署的,并且确认入口唯一。
GitOps是一种理念,具体到工具的功能,需要包含
- 各个状态保存在Git里面
- 能在各个状态间检查不同
- 能实现到想要的状态的切换
Iac
这里又介绍了Iac(Infrastructure as Code) 好处是方便重复,稳定,高校,省钱,基础设施可见
Self-service
通过gitops-operator,原来需要提工单申请的资源,能够被迅速提供,来满足快 速开发发布的需求。
Code reviews
代码通过另外的同事包括leader,团队检查,可以让代码更健壮,也是一种分享 知识的方式,能保证设计的一致性,增强团队凝聚力。
review也可以不是人,可以是具体的工具,比如各种语法检查器,静态代码分析, 安全扫描。
Git pull requests
我们常说的pr, 只申请提交,会产生临时分支和一个临时链接,发给维护的人用 于批准,确认ok以后会自动把分支删掉
 ◎ ../images/k8s/gitops/git-branch-pr.png
Observability
可观测性指的是能够检查当前系统的运行状态并且在需要的时候告警,生产环境 必须要可观测,我们可以通过api,gui界面后者dashboard看到当前环境运行的情 况。
当发生问题的时候,预期和现在state不一致的时候,可以通过git很明显查看 diff。这种状态不同叫做配置漂移configuration drift。
Chapter2 Kubernetes and GitOps
Kubernetes
kubernetes是容器编排平台 2014, docker做了系统隔离,还有一些东西没有包 含
- 容器之间如何沟通
- 流量在容器之间怎么路由
- 当负载增加的时候怎么扩容
- 集群的底层如何扩展
类似的有 docker compose , apache mesos
minikube
关于minikube搭建我就不再赘述了,可以自行google下
这里需要注意把这个clone下来 https://github.com/gitopsbook/resources
|
|
安装kubectl并且查看pods
|
|
进入 gitopsbook/resources/chapter-02 目录,创建 nginx-pod.yaml 资源看
看
|
|
这个时候nginx的pod就在准备中了,你可以使用 kubectl describe pod
nginx 来查看pod的状态
|
|
这个时候pod就部署好了,但是你无法访问,可以使用Port forward方式
|
|
打开浏览器就可以访问了
|
|
如果你希望执行命令,也可以调用kubectl exec -it [POD NAME] [COMMAND]
|
|
删除pod
|
|
介绍了命令行和声明式 分别对应下面两种方式
- kubectl命令创建资源
- kubectl yaml方式管理资源
后面都是一些基础介绍了,介绍了一个命令
|
|
可以监听configmap变化,类似inotify这种
controller.sh 可以发现一个简单的controller就实现了,通过 kubectl get --watch
|
|
中间介绍了几个参数,是一个定时任务
jobTemplate spec
backoffLimit 可以重试失败的次数
|
|
gitops ci example
|
|
build->docker push->kubectl patch new version>git push to config repo
Chapter3 Environment management
在k8s里面,很容易就会想到用namespace隔离环境,用configmap来保存环境的 配置,常见的环境书里面列举了QA, E2E(预发或者release分支), Stage, Prod等。
exercise1
|
|
先这样了
exercise2
网络隔离,可以定义一些policy来限制不同namespace之间的网络连通性
这里需要了解两个术语 一个向内部流,一个是流出
EGRESS
Egress traffic is network traffic that begins inside a network and
pro-ceeds through its routers to a destination somewhere outside the
network.
INGRESS
Ingress traffic is composed of all the data communications and net-work traffic originating from external networks.
|
|
默认是通的,这个时候增加block设置
|
|
这里我不行,我还以为是写错了改了下也不行,后来google发现是cni插件问题,
改成cni试试 minikube start --cni=calico 实际测试也是不行,这里就理解为
minkube不支持network policy吧