Consul

Consul

Consul

安装

 1
 2
 3
 4
 5
 6
 7
 8
 9
10
11
12
13
14
15
16
17
18
19
20
21
22
23
24
25
26
27
28
29
30
31
32
33
34
35
36
37
38
39
40
41
42
43
44
45
46
47
48
49
50
sudo yum install -y yum-utils
sudo yum-config-manager --add-repo https://rpm.releases.hashicorp.com/RHEL/hashicorp.repo
yum -y install consul
cat <<EOF >/usr/lib/systemd/system/consul-server.service
[Unit]
Description="HashiCorp Consul - A service mesh solution"
Documentation=https://www.consul.io/
Requires=network-online.target
After=network-online.target
ConditionFileNotEmpty=/etc/consul.d/consul.hcl

[Service]
EnvironmentFile=/etc/consul.d/consul.env
User=consul
Group=consul
ExecStart=/usr/bin/consul agent -server -bootstrap-expect 1 -ui -bind=0.0.0.0 -client=0.0.0.0 -data-dir=/opt/consul
ExecReload=/bin/kill --signal HUP $MAINPID
KillMode=process
KillSignal=SIGTERM
Restart=on-failure
LimitNOFILE=65536

[Install]
WantedBy=multi-user.target
EOF

systemctl daemon-reload && systemctl  disable consul && systemctl stop consul && systemctl start consul-server && systemctl enable consul-server
# 如果要装agent 就使用consul那个service就好了,否则建议按照我的配置,我另一台设置了consul的service
# 配置文件如下
cat /usr/lib/systemd/system/consul.service
[Unit]
Description="HashiCorp Consul - A service mesh solution"
Documentation=https://www.consul.io/
Requires=network-online.target
After=network-online.target
ConditionFileNotEmpty=/etc/consul.d/consul.hcl

[Service]
EnvironmentFile=/etc/consul.d/consul.env
User=consul
Group=consul
ExecStart=/usr/bin/consul agent -config-dir=/etc/consul.d/
ExecReload=/bin/kill --signal HUP $MAINPID
KillMode=process
KillSignal=SIGTERM
Restart=on-failure
LimitNOFILE=65536

[Install]
WantedBy=multi-user.target

注意修改下/etc/consul.d和/data/consul的目录权限为consul:consul

可以访问IP:8500看是否能访问,如果不能访问注意下安全组和防火墙

报错了记得去/var/log/messages里面有具体错误

了解consul

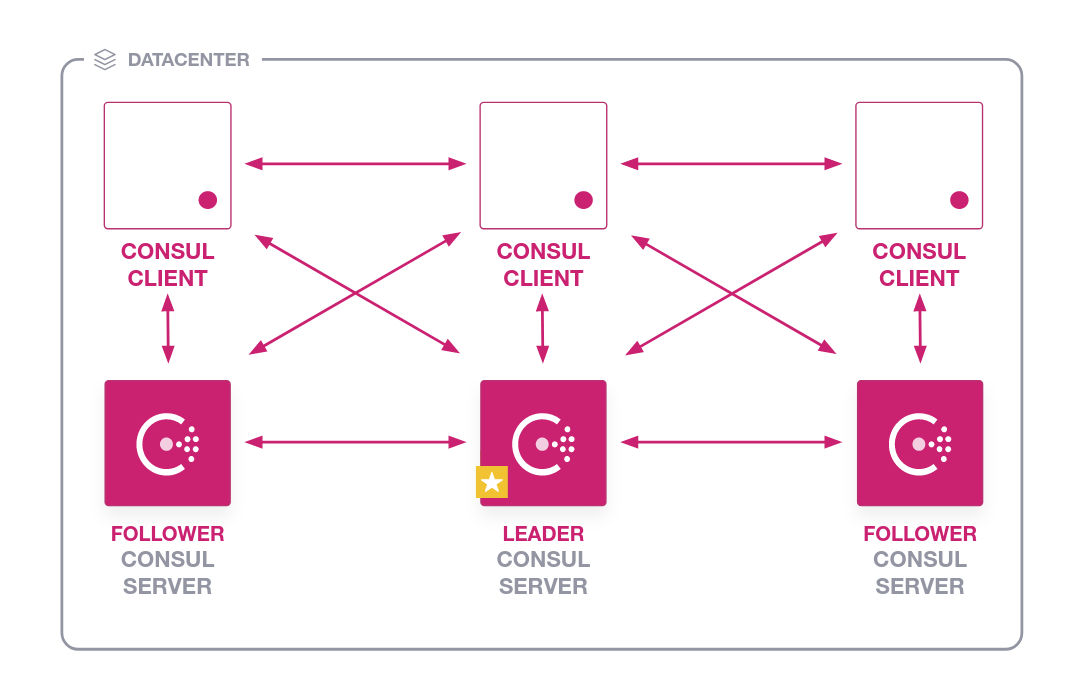
consul根据节点属性分为agent和server,多个server之间会选取一个leader作为master server,而agent只负责转发,类似网关 ../images/consul-architecture.png◎ ../images/consul-architecture.png 生产环境一般建议这样放 ../images/consul-arch-single.png◎ ../images/consul-arch-single.png

concepts概念和architecture架构

../images/consul-arch.png
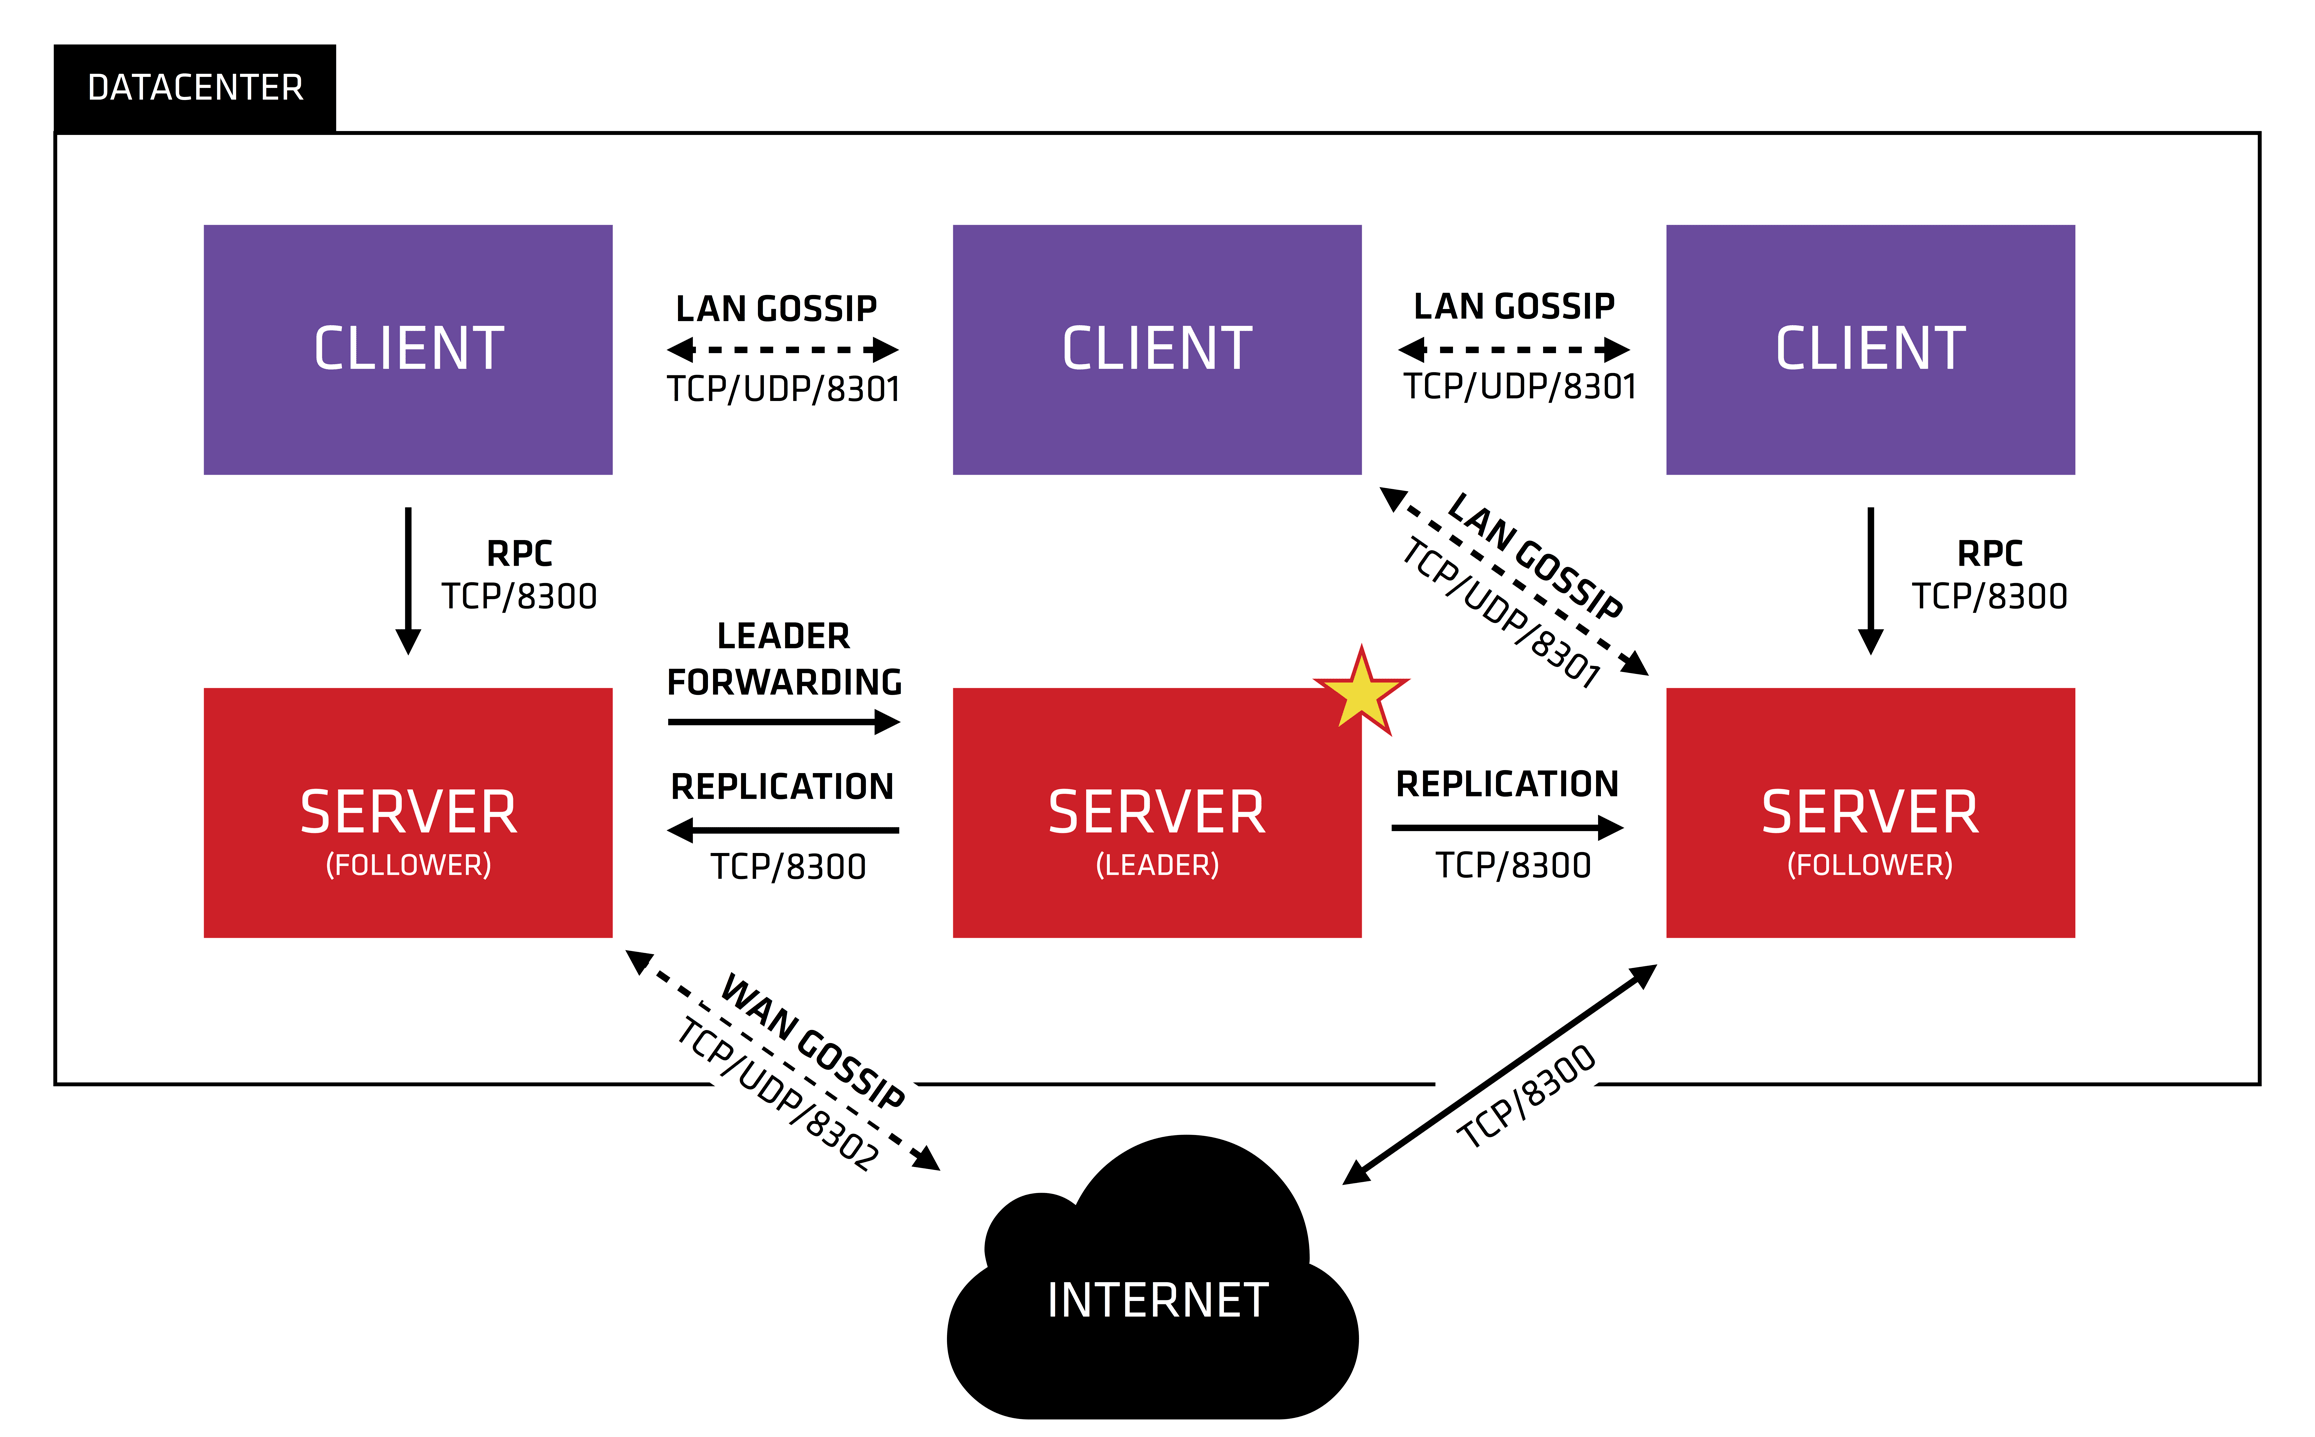
◎ ../images/consul-arch.png 从官网的图可以发现

  • 对于多idc这种情况,通过gossip协议8302端口和网络,多个consul server之前互联,server通常用于datacenter级别
  • 每个datacenter可以部署多个server,这些server会选出一个leader
  • client通过rpc 8300端口和server进行消息传递,各个client通过8301端口通过gossip协议扩散信息
  • 一个datacenter一般建议3个consul server或者5个,而agent可以无限制数量

这里你可能会有一个问题?实际如何访问呢 https://www.consul.io/docs/install/glossary 建议这里看下agent下面的server和client 最终所有节点其实都可以访问,而一般来说会在server开启rpc服务,而client只做转发,但也可以同时设置,最终大家的 信息是一样的

使用

ports

consul的所有port 8300: rpc port 8301: lan gossip 8302: wan gossip 8500: ui port 8600: dns port

配置编写

这里可以先看下一个node的定义,没有jq可以yum -y install jq下载下

 1
 2
 3
 4
 5
 6
 7
 8
 9
10
11
12
13
14
15
16
17
18
19
20
curl -s localhost:8500/v1/catalog/nodes | jq
[
  {
    "ID": "343d3efc-05cc-a762-3fd3-402270802d68",
    "Node": "cf-prod-ops",
    "Address": "172.16.27.71",
    "Datacenter": "dc1",
    "TaggedAddresses": {
      "lan": "172.16.27.71",
      "lan_ipv4": "172.16.27.71",
      "wan": "172.16.27.71",
      "wan_ipv4": "172.16.27.71"
    },
    "Meta": {
      "consul-network-segment": ""
    },
    "CreateIndex": 5,
    "ModifyIndex": 57
  },
]

可以看到完成一个json配置,我们需要注意如下

常用命令

 1
 2
 3
 4
 5
 6
 7
 8
 9
10
11
12
13
14
15
16
17
18
19
20
21
22
23
24
25
26
27
28
29
30
31
32
33
34
35
# consul -h
Usage: consul [--version] [--help] <command> [<args>]

Available commands are:
acl            Interact with Consul's ACLs
agent          Runs a Consul agent
catalog        Interact with the catalog
config         Interact with Consul's Centralized Configurations
connect        Interact with Consul Connect
debug          Records a debugging archive for operators
event          Fire a new event
exec           Executes a command on Consul nodes
force-leave    Forces a member of the cluster to enter the "left" state
info           Provides debugging information for operators.
intention      Interact with Connect service intentions
join           Tell Consul agent to join cluster
keygen         Generates a new encryption key
keyring        Manages gossip layer encryption keys
kv             Interact with the key-value store
leave          Gracefully leaves the Consul cluster and shuts down
lock           Execute a command holding a lock
login          Login to Consul using an auth method
logout         Destroy a Consul token created with login
maint          Controls node or service maintenance mode
members        Lists the members of a Consul cluster
monitor        Stream logs from a Consul agent
operator       Provides cluster-level tools for Consul operators
reload         Triggers the agent to reload configuration files
rtt            Estimates network round trip time between nodes
services       Interact with services
snapshot       Saves, restores and inspects snapshots of Consul server state
tls            Builtin helpers for creating CAs and certificates
validate       Validate config files/directories
version        Prints the Consul version
watch          Watch for changes in Co

members可以查看当前的集群成员,包括server和client catalog可以查看资源的情况 validate检查文件是否有问题

service配置(以prometheus exporter为例)

可以参考 官方service配置文档

配置node_exporter service

1
2
3
4
5
6
7
8
service {
  name = "node-exporter"
    tags =  ["linux","node-exporter"]
      meta =  {
          notice =  "linux server"
}
  port = 9100
}

配置windows_exporter service

1
2
3
4
5
6
7
8
service {
  name = "windows-exporter"
    tags =  ["windows","windows-exporter"]
      meta =  {
          notice =  "windows server"
}
  port = 9182
}

ansible实际部署

准备工作

远程机器
  • 需要安装python,windows可以用cygwin装
  • 需要开启cygwsshd服务,确保ansible能连上
证书服务器

在一台服务器上建议是ansible的机器操作证书

1
2
3
4
5
6
7
8
9
# 生成private根证书ca
consul tls ca create
# 确认dc名字,具体在server的配置里面哈
# 生成server证书
consul tls cert create -server -dc your_dc
# client怎么获取证书呢,有auto_encrypt选项,server可以自己分发给client, 具体见ansible配置哈
# 生成gossip key,用于互联认证
consul keygen
# 把生成的保存备用

tasks

 1
 2
 3
 4
 5
 6
 7
 8
 9
10
11
12
13
14
15
16
17
18
19
20
21
22
23
24
25
26
27
28
29
30
31
32
33
34
35
36
37
38
39
40
41
42
43
44
45
46
47
48
49
50
51
52
53
54
55
56
57
58
59
60
61
62
63
64
65
66
67
68
69
70
71
72
73
74
75
76
77
78
79
80
81
82
83
84
85
86
87
88
89
90
# used for install consul agent by lqx at 20210916.
# notice: must use facter role before for different os.
- name: install consul for linux
  shell: |
      sudo yum install -y yum-utils
  sudo yum-config-manager --add-repo https://rpm.releases.hashicorp.com/RHEL/hashicorp.repo
  sudo yum -y install consul
  when: system.stdout == "linux"

- name: copy consul 1.10.2 for windows
  copy:
  src: consul.exe
  mode: 0755
  dest: /usr/local/bin/
  when: system.stdout == "windows"

- name: ensure directory is in for linux
  file:
  mode: 0755
  owner: consul
  state: directory
  path: "{{item}}"
  with_items:
  - /etc/consul.d
  - /data/consul
  when: system.stdout == "linux"

- name: ensure directory is in for windows
  file:
  mode: 0755
  owner: Administrator
  state: directory
  path: "{{item}}"
  with_items:
  - /etc/consul.d
  - /data/consul
  when: system.stdout == "windows"

- name: sync pem files for linux
  copy:
  src:  "{{item}}"
  owner: consul
  mode: 0644
  dest: "/etc/consul.d/{{item}}"
  force: yes
  with_items:
  - consul-agent-ca.pem
  - service-linux.hcl
  when: system.stdout == "linux"

- name: sync pem files for windows
  copy:
  src:  "{{item}}"
  owner: Administrator
  mode: 0644
  dest: "/etc/consul.d/{{item}}"
  force: yes
  with_items:
  - consul-agent-ca.pem
  - service-windows.hcl
  when: system.stdout == "windows"

- name: set consul config for linux
copy:
src: consul.hcl
dest: /etc/consul.d/consul.hcl
force: yes
when: system.stdout == "linux"

- name: set consul config for windows
  copy:
  src: consul-windows.hcl
  dest: /etc/consul.d/consul.hcl
  when: system.stdout == "windows"

- name: start consul agent for linux
shell: |
    systemctl start consul && systemctl enable consul
when: system.stdout == "linux"


- name: create consul service for windows
shell: |
    sc create "consul" binPath= "c:/cygwin64/usr/local/bin/consul.exe agent -config-dir=c:/cygwin64/etc/consul.d/"  DisplayName= consul start= auto
ignore_errors: true
when: system.stdout == "windows"

- name: reload consul services
shell: |
    /usr/local/bin/consul reload

playbooks

 1
 2
 3
 4
 5
 6
 7
 8
 9
10
11
12
13
14
15
16
# used for init windows servers like game or master by lqx at 20210916.
- hosts: windows-init
gather_facts: false
roles:
- { role: facter }
- { role: windows-exporter }
- { role: consul }


# used for init linux servers like game or master by lqx at 20210916.
- hosts: linux-init
gather_facts: false
roles:
- { role: facter }
- { role: linux-exporter }
- { role: consul }

files

这里需要注意很多东西,改的时候建议都要注意下,因为可能改了一个,sc的服务就起不来了

 1
 2
 3
 4
 5
 6
 7
 8
 9
10
11
12
13
14
15
16
17
18
19
20
21
22
23
24
25
26
27
28
  # cat /etc/ansible/roles/consul/files/consul-windows.hcl
  datacenter = "your_dc"
  server = false
  encrypt = "your gossip token with consul keygen"
  start_join = ["your consul server ip"]
  auto_encrypt {
    tls = true
  }
  connect {
    ca_provider = "consul"
  }
  log_file = "c:/consul/consul.log"
  data_dir = "c:/consul/data"
  # cat /etc/ansible/roles/consul/files/consul.hcl
  datacenter = "your_dc"
  server = false
  data_dir = "/data/consul"
  encrypt = "your gossip token with consul keygen"
  start_join = ["your consul server ip"]
  performance {
        raft_multiplier = 1
  }
  auto_encrypt {
        tls = true
  }
  connect {
        ca_h2provider = "consul"
  }

还要注意 把ca放到ansible的files目录, 每个client需要ca证书,但是key不要发 我的server的配置,仅供参考

 1
 2
 3
 4
 5
 6
 7
 8
 9
10
11
12
13
14
15
16
17
18
19
20
21
datacenter = "your_dc"
data_dir = "/data/consul"
client_addr = "0.0.0.0"
ui_config{
  enabled = true

}
server = true
bind_addr = "0.0.0.0" # Listen on all IPv4
encrypt = "your gossip token with consul keygen"
retry_join = ["your server ip"]
skip_leave_on_interrupt =  true,
leave_on_terminate =  false
auto_encrypt {
  allow_tls = true
}
key_file =  "/etc/consul.d/your_dc-server-consul-0-key.pem"
cert_file =  "/etc/consul.d/your_dc-server-consul-0.pem"
ca_file =  "/etc/consul.d/your_dc-agent-ca.pem"
verify_incoming =  true
verify_outgoing =  true

windows服务相关

简要说下sc命令

sc
1
2
3
4
5
6
7
8
9
# sc create a service
# prefer no type, if use type, donnot use share, will cause 1048, if start error, will cause 1046
sc create service_name binPath=空格 "xxxx.exe" DisplayName= "xxx" auto= start type= xxx
# sc start a service, case-insensitive
sc start service_name
# sc stop a service, case-insensitive
sc stop service_name
# sc delete a service
sc delete service_name
windows也可以从choco安装consul

也可以用choco安装consul,这样好处是可以避免错误,具体我不再赘述,choco安装后会有一个consul service,是nssm管理的

检查

检查consul端口是否开启,server的consul 8500页面是否都注册上去了

跨datacenter

怎么跨datacenter呢, 通过gossip wan, 具体请参考文末的gossip wan的配置文档 正常的配置都是retry_join = [所有的server] 但是如果你跨datacenter则会报错,说不匹配datacenter 可以配置成retry_join_wan = [所有的wan server] 我实际配置下来,发现还是另一个datacenter的是处于failed状态,内网不通

1
2
3
4
5
6
7
8
9
# local consul server get remote consul server
curl http://localhost:8500/v1/catalog/nodes?dc=london
 Remote DC has no server currently reachable
consul members -wan
Node                              Address              Status  Type    Build   Protocol  DC         Segment
inner1             172.16.27.71:8302    alive   server  1.10.2  2       innert <all>
london   172.31.213.185:8302  failed  server  1.10.2  2        london  <all>
inner2  172.16.27.79:8302    alive   server  1.10.2  2         inner  <all>
inner3  172.16.27.80:8302    alive   server  1.10.2  2         inner  <all>>

从实际命令来看,可能是监听的8302地址是内网ip导致的,8302对应的是gossip wan,需要查下对应的配置是什么 实际配置后来发现没啥效果, 分析原因可能是云是通过nat绑定外网ip的,服务器本身并不会有wan接口,所以这个时候考虑使用云的provider插件来实现join哈 具体请参考cloud auto join,但是发现他并不是解决这个问题的,所以放弃 后来出现报错tls: client didn't provide a certificate, 建议重启下对应的服务器的consul agent

服务健康检查

一般来说consul服务有对应的一个健康检查, 这里要注意如果要本地执行命令,需要设置enable-local-script-checks = true, 具体请参考配置local-script-checks 写几个简单的例子 eg1: check_with_local_script

 1
 2
 3
 4
 5
 6
 7
 8
 9
10
11
12
13
14
15
16
17
18
19
20
21
22
cat service-linux.hcl
service {
  name = "node-exporter"
  tags =  ["linux","node-exporter"]
  meta =  {
    notice =  "linux server"
  }
 checks =  [
      {
         args =  ["ls", "/home"],
         interval =  "5s"
       },
 ]
 port = 9100
}
consul reload
Error reloading: Unexpected response code: 500 \
(Failed reloading services: Failed to register service "node-exporter": Scripts are disabled on this agent; to enable, \
configure 'enable_script_checks' or 'enable_local_script_checks' to true)
# 这个时候需要在hcl里面加一行enable_local_script_checks = true, 然后重启(注意是重启,不是reload),因为涉及到启动参数了
重启完以后发现,服务还是1, 表示正常,因为返回值为0,所以为1,是up
这个时候把home改成home1,发现服务就是1了

需要注意一点,如果是windows,因为是consul.exe是windows下编译的,所以这个时候可以这样写哈

1
args = ["powershell","windows的命令"]

常见问题

consul导致io比较卡或者无法加入

建议降级版本,最近是否有升级 https://developer.hashicorp.com/consul/downloads 这里面选择指定的版本 就好了,然后下载二进制 覆盖/usr/bin/consul就好了

agent: startup error: error="error reading server metadata: unexpected end of JSON input"

删除consul数据目录的server_metadata.json 然后重启下服务看下