Prometheus

Prometheus

Prometheus

Prometheus介绍

prometheus脱胎于brogmon(brog的监控程序), 是继nagios、zabbix、openfalcon等监控程序以来的最受大家欢迎的监控程序,以opentsdb为数据库,存储时序性信息,push通过pushgateway,其他主动通过pull,服务器段拉取, 通过强大的组件能满足多场景尤其是微服务化和虚拟化场景的需求。

什么时候选择它,什么时候不应该选择它

选择的原因
需要监控和告警时间序列的数据,比如http的响应时间等

zabbix其实也可以,但是zabbix用的mysql数据库,查询和保存都没有时序性数据库优化好

数据中心维度服务器监控和面向app的监控都可以,尤其是k8s类,希望对整体业务SLA等进行监控的

zabbix对app也支持,个人觉得不是很方便,目前来看更适合idc机房等

深入到系统内部进行监控,比如用到的核心中间件或者跟踪整个链路,并进行高强度的定制化,获得服务的真正运行状态
不喜欢客户端安装,强调可扩展性

prometheus默认不需要安装客户端,各个组件都是二进制文件直接可以运行不依赖环境

需要趋势统计和预测的,对于zabbix通常没有默认的预测模型和系统
promql语言强大,可以聚合等直接查询
不选择的原因
  • 已经使用其他的监控方案,成熟使用并满足自身需求,或者团队具有自研监控 的能力
  • 期待它完成日志性的东西并不适合

安装

安装比较简单,建议用源安装

注意有1和2版本,建议安装prometheus2

debian系:

1
apt-get install prometheus -y or apt-get install prometheus2

rhel系:

 1
 2
 3
 4
 5
 6
 7
 8
 9
10
11
cat <<EOF >/etc/yum.repos.d/prometheus.repo
[prometheus]
name=prometheus
baseurl=https://packagecloud.io/prometheus-rpm/release/el/\$releasever/\$basearch
repo_gpgcheck=1
enabled=1
gpgkey=https://packagecloud.io/prometheus-rpm/release/gpgkey
       https://raw.githubusercontent.com/lest/prometheus-rpm/master/RPM-GPG-KEY-prometheus-rpm
gpgcheck=1
metadata_expire=300
EOF

yum -y install prometheus # 注意需要先导入源,具体请参考文末链接,但是有个错误$没转译,所以注意\$ yum -y install prometheus2 安装以后访问9090,注意打开安全组或者防火墙,界面非常简单,proms存储的是一组时间序列数据,目测和influxdb还是有点像,整体也是以metrics为单位

部署

prometheus自己的日志

这里发现所有的日志都进入到了/var/log/messages里面了,非常的不方便 这里有两个办法, 一个是设置StandardOutput=控制systemctl的output(但我设置了并没有成功),一个是设置syslog 这里我用syslog的办法 具体请参考Rsyslog

真正的自动发现

这个时候已经可以通过consul来告诉prometheus来直接连接metrics了,但是对于服务器来说, 希望能从cmdb里面拉取targets,这里有两个思路

写个定时任务脚本,定时sync targets

这里其实可以放到cmdb里面集成,也可以linux定时任务操作

linux定时任务适合少量服务器场景

如果大量,设计到host增删改查的时候,适配下consul的部分即可,即把consul当成cmdb的一个核心组件,这个思路不错,

因为同样的,你还会用到它注册agent,所以针对consul我们可以设计很多好用的功能,让他系统和业务属性进行上报

否则让agent自己注册会发现agent根本不知道自己是谁,属于谁等等,而这,只需要在镜像中维护一个consul.json文件即可

但是还是要维护json,其实也比较麻烦,而且容易出错

而在各种metrics里面实现自己的信息,通常是监控指标,不建议放太多其他的类似日志的信息

寻找其他server discovery插件(sd)比如http的并配置

可以看下这里的配置,具体不再演示 http_sd_config

http返回码需要200,Content-Type为application/json 返回样式为

1
2
3
4
5
6
7
8
9
[
  {
    "targets": [ "<host>", ... ],
    "labels": {
      "<labelname>": "<labelvalue>", ...
    }
  },
  ...
]

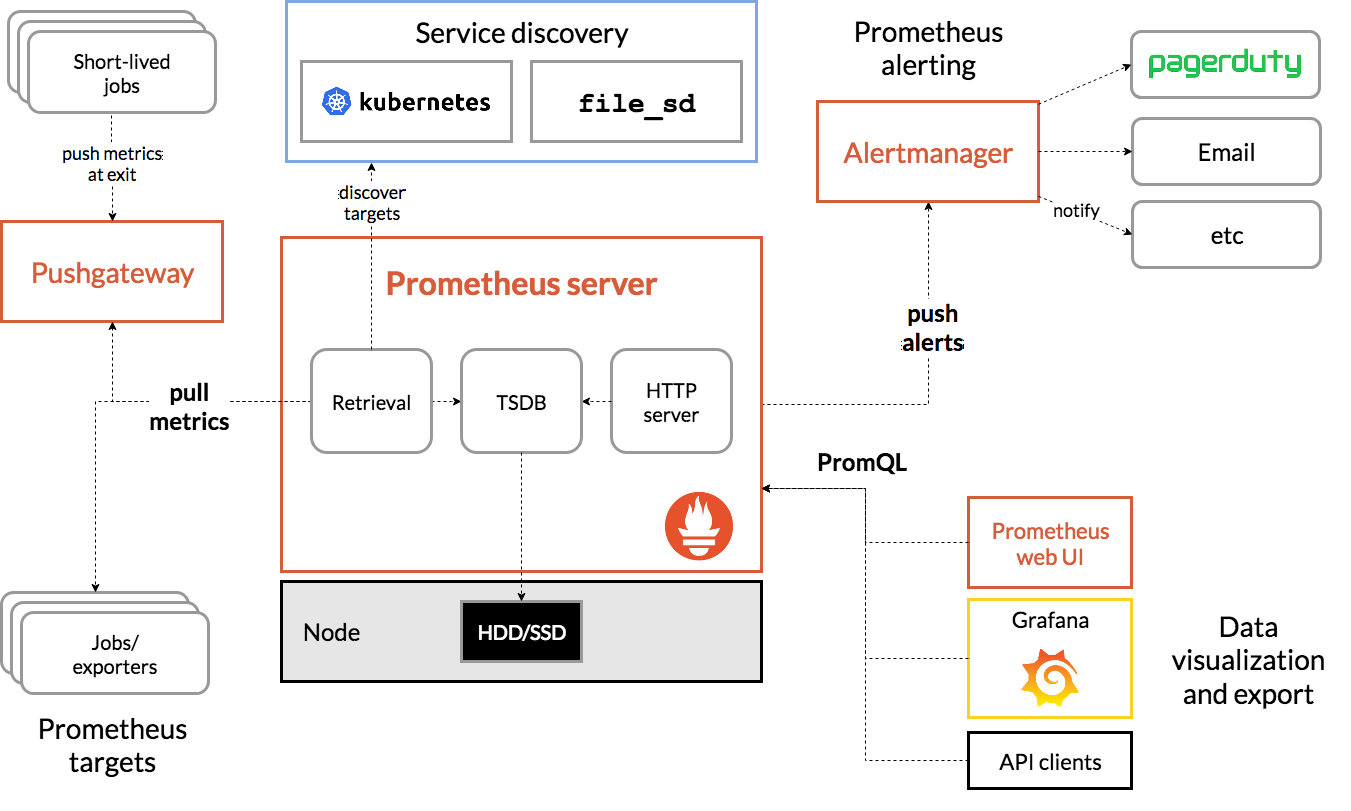
组件框架和结构 (参考https://www.prometheus.wang/quickstart/prometheus-arch.html

官方架构图 ../images/prometheus-architecture.png◎ ../images/prometheus-architecture.png

架构介绍

可以明显看出来如下:

  1. 服务器的信息会被prometheus主动从exporter pull(采集)过来
  2. 如果不能pull的就通过一个push gateway的一个代理,让服务器定期上报到gateway,然后服务器从代理pull(采集)过来
  3. 通过alert manager发送告警信息
  4. 前端可以通过promql查询opentsdb的数据,当然为了可视化,可以通过grafana、Promdash等可视化工具,可以做的非常方便漂亮,毕竟prometheus的界面…
  5. 和zabbix类似,有自己的auto discovery模块可以自动发现服务和服务器
  6. exports提供专门http端口负责专门的软件信息收集

prometheus使用

参考官文https://prometheus.io/docs/prometheus/latest/configuration/configuration/

prometheus service配置

prometheus.yml配置

 1
 2
 3
 4
 5
 6
 7
 8
 9
10
11
12
13
14
15
16
17
18
19
20
21
22
23
24
25
26
27
28
29
30
31
32
33
34
35
36
37
38
39
40
41
42
43
44
45
#  /etc/prometheus/prometheus.yml
# Sample config for Prometheus.

global:
  scrape_interval:     15s # Set the scrape interval to every 15 seconds. Default is every 1 minute.
  evaluation_interval: 15s # Evaluate rules every 15 seconds. The default is every 1 minute.
  # scrape_timeout is set to the global default (10s).

  # Attach these labels to any time series or alerts when communicating with
  # external systems (federation, remote storage, Alertmanager).
  external_labels:
      monitor: 'example'

# Alertmanager configuration
alerting:
  alertmanagers:
  - static_configs:
    - targets: ['localhost:9093']

# Load rules once and periodically evaluate them according to the global 'evaluation_interval'.
rule_files:
  # - "first_rules.yml"
  # - "second_rules.yml"

# A scrape configuration containing exactly one endpoint to scrape:
# Here it's Prometheus itself.
scrape_configs:
  # The job name is added as a label `job=<job_name>` to any timeseries scraped from this config.
  - job_name: 'prometheus'

    # Override the global default and scrape targets from this job every 5 seconds.
    scrape_interval: 5s
    scrape_timeout: 5s

    # metrics_path defaults to '/metrics'
    # scheme defaults to 'http'.

    static_configs:
      - targets: ['localhost:9090']

  - job_name: node
    # If prometheus-node-exporter is installed, grab stats about the local
    # machine by default.
    static_configs:
      - targets: ['localhost:9100']

注意一下内容:

  1. 几个端口9090 9093 9100分别是什么含义
  2. 如何自定义rule和自动以config

通过自己写rules.yaml包含在里面

  1. 默认pull的间隔是15s,如果自己要改可以在job_name下面覆盖掉

采集exporter

exporter列表

每个exporter其实是一组采集器,采集和上传数据, 可以看到有很多的exporter,

常见的第三方exporter https://github.com/prometheus/docs/blob/main/content/docs/instrumenting/exporters.md

 1
 2
 3
 4
 5
 6
 7
 8
 9
10
11
12
13
14
15
16
17
18
19
20
21
22
23
24
25
26
27
28
29
30
31
32
33
34
35
36
37
38
39
# yum search prome|grep exporter
apache_exporter.x86_64 : Prometheus exporter Apache webserver mertics.
artifactory_exporter.x86_64 : Prometheus exporter for JFrog Artifactory stats.
bareos_exporter.x86_64 : Prometheus exporter for BareOS data recovery system
bind_exporter.x86_64 : Prometheus exporter for Bind nameserver
collectd_exporter.x86_64 : Collectd stats exporter for Prometheus.
consul_exporter.x86_64 : Consul stats exporter for Prometheus.
couchbase_exporter.x86_64 : Prometheus exporter for Couchbase server metrics.
domain_exporter.x86_64 : Prometheus exporter for domain expiration time metrics
ebpf_exporter.x86_64 : Prometheus exporter for custom eBPF metrics
elasticsearch_exporter.x86_64 : Elasticsearch stats exporter for Prometheus.
exporter_exporter.x86_64 : Simple reverse proxy for Prometheus exporters
frr_exporter.x86_64 : Prometheus exporter for FRR metrics
golang-github-prometheus-node-exporter.x86_64 : Exporter for machine metrics
graphite_exporter.x86_64 : Server that accepts metrics via the Graphite protocol
haproxy_exporter.x86_64 : This is a simple server that scrapes HAProxy stats and
influxdb_exporter.x86_64 : InfluxDB stats exporter for Prometheus.
iperf3_exporter.x86_64 : Prometheus exporter for iPerf3 probing.
jmx_exporter.noarch : Prometheus exporter for mBeans scrape and expose.
jolokia_exporter.x86_64 : Prometheus exporter for jolokia metrics
json_exporter.x86_64 : A Prometheus exporter which scrapes remote JSON by
junos_exporter.x86_64 : Prometheus exporter for Junos device metrics.
kafka_exporter.x86_64 : Kafka exporter for Prometheus.
keepalived_exporter.x86_64 : Prometheus exporter for Keepalived metrics
memcached_exporter.x86_64 : Memcached stats exporter for Prometheus.
mongodb_exporter.x86_64 : A Prometheus exporter for MongoDB including sharding,
mysqld_exporter.x86_64 : Prometheus exporter for MySQL server metrics.
nginx_exporter.x86_64 : NGINX Prometheus Exporter for NGINX and NGINX Plus.
node_exporter.x86_64 : Prometheus exporter for machine metrics, written in Go
openstack_exporter.x86_64 : Prometheus exporter for OpenStack metrics.
pgbouncer_exporter.x86_64 : Prometheus exporter for PgBouncer.
phpfpm_exporter.x86_64 : A prometheus exporter for PHP-FPM. The exporter
postgres_exporter.x86_64 : Prometheus exporter for PostgreSQL server metrics
process_exporter.x86_64 : Process exporter for Prometheus.
rabbitmq_exporter.x86_64 : Prometheus exporter for RabbitMQ metrics
redis_exporter.x86_64 : Prometheus exporter for Redis server metrics.
snmp_exporter.x86_64 : Prometheus SNMP exporter.
ssl_exporter.x86_64 : Prometheus exporter for SSL certificates.
statsd_exporter.x86_64 : Export StatsD metrics in Prometheus format.
安装linux监控

node_export github node_export 官网

 1
 2
 3
 4
 5
 6
 7
 8
 9
10
11
12
13
14
yum -y install node_exporter
# 设置下开机自启动
cat <<EOF > /etc/systemd/system/node_exporter.service
[Unit]
Description = Prometheus node exporter with machine statistics

[Service]
ExecStart = /usr/bin/node_exporter

[Install]
WantedBy = multi-user.target
EOF
systemctl daemon-reload
systemctl enable node_exporter

基本上按照上面操作一下,web界面过一会就会有node开头的metric了

安装windows监控

使用https://github.com/prometheus-community/windows_exporter releases下载地址 安装,然后prometheus服务器加上9182的配置即可 安装好以后会出现一个windows_exporter的服务, 这个时候telnet windows_ip 9182看是否通 如果不通检查防火墙和安全组, 然后reload 此时看http://xxx:9090/targets 发现服务器up了 systemctl reload prometheus

配置黑盒监控

从用户角度,用一个探针看一个链接或者端口的延迟等信息, 具体可以参考黑盒exporter github 直接安装就好了,没有安装参考前面的promethes.repo设置,配置不难,如果需要检查和content相关可以参考 官方给的示例 https://github.com/prometheus/blackbox_exporter/blob/master/example.yml fail_if_body_not_matches_regexp, 具体不再演示

1
2
yum -y install blackbox_exporter
systemctl start blackbox_exporter && systemctl enable blackbox_exporter

资产targets

安装consul
prometheus配置consul
 1
 2
 3
 4
 5
 6
 7
 8
 9
10
11
# /etc/prometheus/prometheus.yml
- job_name: 'consul-prometheus'
  consul_sd_configs:
    - server: 'localhost:8500'
      services: []
  relabel_configs:
    - source_labels: [__meta__consul_tags]
      regex: ^xxx.*
      action: keep
    - regex: __meta_consul_service_metadata_(.+)
      action: labelmap

这个时候consul注册上来的带有xxx的标签的服务器才会被选中, 在consul注册的逻辑里面,我们可以加入丰富的业务逻辑,来方便识别和告警 这里需要明白: node服务器本身不需要配置,只需要管理服务器直接代其注册到consul,prometheus会做具体的连接和监控 所以我们先把之前的windows和linux的配置注释掉,然后在管理机器上执行如下命令测试下consul连接情况

配置时候还是起不来 Get http://172.16.27.71:8300/metrics: read tcp 172.16.27.71:42006->172.16.27.71:8300: read: connection reset by peer

其实这个是正常的,因为他没有metrics这个api,惊不惊喜,哈哈

先向consul里面塞一条node的数据

curl -XPUT -d '{"id":"test1", "name": "node-exporter-172.16.27.71", "address":"172.16.27.71", "port":9100,"tags":["liuliancao.com"],"checks":[{"http":"http://172.16.27.71:9100/metrics","interval":"5s"}]}' http://localhost:8500/v1/agent/service/register

(如果不加relabel和services的限制)塞完以后发现当前node exporter是ok的,而他的数据都是metrics形式展示出来 ../images/prometheus-consul1.jpg◎ ../images/prometheus-consul1.jpg

这里一定要注意,在prometheus里面services选项一定要填name对应的值,为了避免有问题,建议id和name保持一致哈,否则会一致没注册上来

注意这里

  • 可以加很多个主机的exporter,每个可以分属不同的service或者带自定义参数
  • 可以让开发或者部署脚本的地方加入consul加入和移除逻辑,这样,整个链路就是自更新的
  • 可以自己写一些符合metrics的api,放到这里面就是一个监控项目
  • 创建服务器的时候,向consul里面插入一条监控数据,销毁的时候,从consul里面deregister这个服务

最终配置

 1
 2
 3
 4
 5
 6
 7
 8
 9
10
11
12
13
14
15
16
17
18
19
20
21
22
23
24
25
26
scrape_configs:
  # The job name is added as a label `job=<job_name>` to any timeseries scraped from this config.
  - job_name: 'prometheus'

    # metrics_path defaults to '/metrics'
    # scheme defaults to 'http'.

    static_configs:
      - targets: ['localhost:9090']
  #- job_name: node
  #  static_configs:
  #    - targets: ['localhost:9100']

  #- job_name: windows
  #  static_configs:
  #    - targets: ['172.16.27.68:9182']
  - job_name: 'consul-prometheus'
    consul_sd_configs:
      - server: 'localhost:8500'
        services: ["node-exporter-172.16.27.71"]
    relabel_configs:
      - source_labels: [__meta__consul_tags]
        regex: .*
        action: keep
      - regex: __meta_consul_service_metadata_(.+)
        action: labelmap

整体下来会发现,prometheus提供了一个空间,这个空间填我们要测试的数据的api接口,对他们进行汇总和统计

promql

参考https://www.prometheus.wang/promql/

metrics

prometheus的数据和grafa匹配 指标类型(metric type):Counter(计数器)、Gauge(仪表盘)、Histogram(直方图)、Summary(摘要)

了解metrics的data model

具体可以看下 https://prometheus.io/docs/concepts/data_model/https://prometheus.io/docs/practices/naming/ 一条metrics里面的信息如下 <metric name>{<label name>=<label value>, …} 这样比较抽象,我们可以看下linux的node_exporter的10条信息

 1
 2
 3
 4
 5
 6
 7
 8
 9
10
11
curl -s 172.16.27.71:9100/metrics|grep -v '^#'|grep -v go|head -n 10
node_arp_entries{device="eth0"} 9
node_boot_time_seconds 1.63048938e+09
node_context_switches_total 2.397081033e+09
node_cooling_device_cur_state{name="0",type="Processor"} 0
node_cooling_device_cur_state{name="1",type="Processor"} 0
node_cooling_device_cur_state{name="2",type="intel_powerclamp"} -1
node_cooling_device_max_state{name="0",type="Processor"} 0
node_cooling_device_max_state{name="1",type="Processor"} 0
node_cooling_device_max_state{name="2",type="intel_powerclamp"} 50
node_cpu_guest_seconds_total{cpu="0",mode="nice"} 0

如果了解influxdb的应该很快就可以看出来(不了解可以看下我的influxdb文章),这个和influxdb的太像了, 我们可以对应下 第一个值是一个字符串,字符串里面可以写labels,label是加索引的,方便根据label查询, 后面跟上值即可

这里我们可以根据最佳实践注意几个问题 metric name

  • 不要用无意义字符,建议就字母数字加_,不要用太奇怪的
  • 有一个应用前缀,比如redis_read_qps_all
  • 最好要有单位 比如redis_read_latency_seconds

labels里面不要再用metric里面的字段了,容易产生歧义

counter

计数器,只增不减除非发生重置,比如请求量等

gauge 可增可减的仪表盘

比如可用内存等

histogram && summary

分析历史数据,比如0-2ms的时间请求量,2ms-5ms的时间请求量,并对之进行汇总统计

获取指定名称的数据 可在http://192.168.10.204:9090/graph?g0.range_input=1h&g0.expr=promhttp_metric_handler_requests_total&g0.tab=1 测试

http_requests_total http_requests_total{}

=和!=都支持

http://192.168.10.204:9090/graph?g0.range_input=1h&g0.expr=promhttp_metric_handler_requests_total%7Bcode%3D%22500%22%7D&g0.tab=1 http_requests_total{node="500"}

支持正则

http://192.168.10.204:9090/graph?g0.range_input=1h&g0.expr=promhttp_metric_handler_requests_total%7Bcode%3D~%22500%7C200%22%7D&g0.tab=1 http_requests_total{node=~"500|200"} http_requests_total{node!~"500"}

范围查询

http_request_total{}[5m] 最近5分钟的数据http://192.168.10.204:9090/graph?g0.range_input=1h&g0.expr=promhttp_metric_handler_requests_total%7Bcode%3D~%22500%7C200%22%7D%5B5m%5D&g0.tab=1

时间位移查询

http_request_total{} offset 5m 5分钟前的瞬时数据 http_request_total{}[1d] offset 1d 昨天一天的数据

聚合

常用的聚合函数 sum (求和), min (最小值), max (最大值), avg (平均值), stddev (标准差), stdvar (标准差异), count (计数), count_values (对value进行计数), bottomk (后n条时序), topk (前n条时序), quantile (分布统计) 聚合的语法 <aggr-op>([parameter,] <vector expression>) [without|by (<label list>)] example sum(http_requests_total) without (instance) sum(http_requests_total) by (code,handler,job,method) sum(http_requests_total) count_values("count", http_requests_total) topk(5, http_requests_total) 前五位排序 quantile(0.5, http_requests_total) 计算分布情况 0.5是中位数

increase

返回增长量

rate

返回增长速率

irate

返回增长速率,更准确强调瞬时变化率, 但不适合长期计划速率波动的情形

predict_linear

predict_linear(node_filesystem_free{job="node"}[2h], 4 * 3600) < 0

标签替换

label_replace(up, "host", "$1", "instance", "(.*):.*") 意思是替换up的instance变量的:前的第一个值捕获,放到host标签中

HTTP api调用

可以通过/v1/api调用

删除某个series

注意此操作不可逆,确认ok以后再进行操作

1
curl -X DELETE http://localhost:9090/api/v1/series?match[]={your_item_name="your_item_value"}

PushGateway

默认proms是pull拉取服务器的监控数据的,如果由于nat等情况导致收集不上来,可以通过安装push gateway做一个中转,服务器先把数据发到push gateway里面,gateway再转发到proms server

可以通过把数据通过POST方式上传到Pushgateway,prometheus收集pushgateway即可

 1
 2
 3
 4
 5
 6
 7
 8
 9
10
# prometheus.yml
- job_name: "pushgateway"
    scrape_interval: 60s

    honor_labels: true

    static_configs:
      - targets: ['xxx:9091']
        labels:
          instance: pushgateway

推送数据

1
2
3
4
5
6
7
8
# single
echo "pushgateway_test 1234" | curl --data-binary @- http://xxx:9091/metrics/job/pushgateway_test

# multi
cat <<EOF | curl --data-binary @- http://xxx:9091/metrics/job/test_data
test_data{node="1.1.1.1",level="32"} 0
test_data{node="1.1.1.2",level="64"} 1
EOF

如果报错,尝试在test_data后面继续加入维度比如/$host

Alertmanager

安装
1
2
3
4
5
6
7
yum -y install alertmanager
systemctl start alertmanager && systemctl enable alertmanager
#prometheus.yml增加如下配置并reload
alerting:
  alertmanagers:
    - static_configs:
        - targets: ['localhost:9093']
使用

建议先阅读一遍 Prometheus alertmanger官方配置, alert分为几个部分 这里先看官方的一个示例

  1
  2
  3
  4
  5
  6
  7
  8
  9
 10
 11
 12
 13
 14
 15
 16
 17
 18
 19
 20
 21
 22
 23
 24
 25
 26
 27
 28
 29
 30
 31
 32
 33
 34
 35
 36
 37
 38
 39
 40
 41
 42
 43
 44
 45
 46
 47
 48
 49
 50
 51
 52
 53
 54
 55
 56
 57
 58
 59
 60
 61
 62
 63
 64
 65
 66
 67
 68
 69
 70
 71
 72
 73
 74
 75
 76
 77
 78
 79
 80
 81
 82
 83
 84
 85
 86
 87
 88
 89
 90
 91
 92
 93
 94
 95
 96
 97
 98
 99
100
101
102
103
104
105
106
107
108
109
110
111
112
113
114
115
116
117
118
119
120
121
122
global:
  # The smarthost and SMTP sender used for mail notifications.
  smtp_smarthost: 'localhost:25'
  smtp_from: 'alertmanager@example.org'
  smtp_auth_username: 'alertmanager'
  smtp_auth_password: 'password'

# The directory from which notification templates are read.
templates:
- '/etc/alertmanager/template/*.tmpl'

# The root route on which each incoming alert enters.
route:
  # The labels by which incoming alerts are grouped together. For example,
  # multiple alerts coming in for cluster=A and alertname=LatencyHigh would
  # be batched into a single group.
  #
  # To aggregate by all possible labels use '...' as the sole label name.
  # This effectively disables aggregation entirely, passing through all
  # alerts as-is. This is unlikely to be what you want, unless you have
  # a very low alert volume or your upstream notification system performs
  # its own grouping. Example: group_by: [...]
  group_by: ['alertname', 'cluster', 'service']

  # When a new group of alerts is created by an incoming alert, wait at
  # least 'group_wait' to send the initial notification.
  # This way ensures that you get multiple alerts for the same group that start
  # firing shortly after another are batched together on the first
  # notification.
  group_wait: 30s

  # When the first notification was sent, wait 'group_interval' to send a batch
  # of new alerts that started firing for that group.
  group_interval: 30s

  # If an alert has successfully been sent, wait 'repeat_interval' to
  # resend them.
  repeat_interval: 30s

  # A default receiver
  receiver: team-X-mails

  # All the above attributes are inherited by all child routes and can
  # overwritten on each.

  # The child route trees.
  routes:
  # This routes performs a regular expression match on alert labels to
  # catch alerts that are related to a list of services.
  - matchers:
    - service=~"foo1|foo2|baz"
    receiver: team-X-mails
    # The service has a sub-route for critical alerts, any alerts
    # that do not match, i.e. severity != critical, fall-back to the
    # parent node and are sent to 'team-X-mails'
    routes:
    - matchers:
      - severity="critical"
      receiver: team-X-pager
  - matchers:
    - service="files"
    receiver: team-Y-mails

    routes:
    - matchers:
      - severity="critical"
      receiver: team-Y-pager

  # This route handles all alerts coming from a database service. If there's
  # no team to handle it, it defaults to the DB team.
  - matchers:
    - service="database"
    receiver: team-DB-pager
    # Also group alerts by affected database.
    group_by: [alertname, cluster, database]
    routes:
    - matchers:
      - owner="team-X"
      receiver: team-X-pager
      continue: true
    - matchers:
      - owner="team-Y"
      receiver: team-Y-pager


# Inhibition rules allow to mute a set of alerts given that another alert is
# firing.
# We use this to mute any warning-level notifications if the same alert is
# already critical.
inhibit_rules:
- source_matchers: [ severity="critical" ]
  target_matchers: [ severity="warning" ]
  # Apply inhibition if the alertname is the same.
  # CAUTION:
  #   If all label names listed in `equal` are missing
  #   from both the source and target alerts,
  #   the inhibition rule will apply!
  equal: [ alertname, cluster, service ]


receivers:
- name: 'team-X-mails'
  email_configs:
  - to: 'team-X+alerts@example.org'

- name: 'team-X-pager'
  email_configs:
  - to: 'team-X+alerts-critical@example.org'
  pagerduty_configs:
  - service_key: <team-X-key>

- name: 'team-Y-mails'
  email_configs:
  - to: 'team-Y+alerts@example.org'

- name: 'team-Y-pager'
  pagerduty_configs:
  - service_key: <team-Y-key>

- name: 'team-DB-pager'
  pagerduty_configs:
  - service_key: <team-DB-key>

可用看到alert manager的配置主要是route、matcher、receiver的配置, 了解几个术语

route

对应要对哪些业务告警,比如以服务维度,或者集群维度

matcher

匹配的逻辑是什么,service,关键词,tag等等 这里有个问题,就是我有多少告警并不知道

amtool

目前可以通过下载amtool解决(默认release自带) 如果没有请手动安装

1
go get github.com/prometheus/alertmanager/cmd/amtool

然后访问查看alert列表

1
2
amtool alert  --alertmanager.url="http://localhost:9093"
Alertname  Starts At  Summary  State

这里建议设置下默认的配置,这样不用每次输入url

 1
 2
 3
 4
 5
 6
 7
 8
 9
10
11
12
13
14
15
16
cat <<EOF > /etc/amtool/config.yml
# Define the path that `amtool` can find your `alertmanager` instance
alertmanager.url: "http://localhost:9093"
#
# # Override the default author. (unset defaults to your username)
author: lqx@example.com
#
# # Force amtool to give you an error if you don't include a comment on a silence
# comment_required: true
#
# # Set a default output format. (unset defaults to simple)
# output: extended
#
# # Set a default receiver
# receiver: team-X-pager
EOF

这里为什么是空呢,因为alert rules还没有配置

promtool
 1
 2
 3
 4
 5
 6
 7
 8
 9
10
11
12
13
14
15
16
cat<<EOF > /etc/prometheus/rules/alert-consul.rule
groups:
- name: consul
  rules:
  - alert: ConsulStatus
    expr: consul_serf_lan_member_status{job="consul"} != 1
    for: 2m
    labels:
      severity: page
    annotations:
      summary: Consul serf lan status
EOF
promtool check rules rules/alert-consul.rules
Checking rules/alert-consul.rules
  SUCCESS: 1 rules found
systemctl reload prometheus

记得reload下,这里需要注意一个问题promtool check rules如果你检查一直失败也没关系,需要注意下prometheus的版本, 如果yum装的是prometheus是1.8版本,yum -y install prometheus2则是2.0版本,建议安装2.0版本 因为这个时候写的是rules,是prometheus的东西,这里提示我们看文档一定要注意版本,否则就安装最新版 此时http://your_prometheus:9090/alerts 就可以看到对应的alert了,如果你有一个consul是down的,那么就会有一个pending的 ../images/prometheus-alert0.png◎ ../images/prometheus-alert0.png 过2分钟以后变成fire状态 ../images/prometheus-alert2.png◎ ../images/prometheus-alert2.png 这个时候检查alertmanager的日志,发现tls没有配置,这个时候为了简单,我把tls关掉了,后续需要修掉使用tls会更安全 这里有篇文档参考https://docs.oracle.com/cd/E19120-01/open.solaris/819-1634/fxcty/index.html 或者考虑后续换个发邮件 alertmanager.yml里面增加了一行smtp_require_tls: false

告警配置多个人

只要写多个to就好了,且多个configs就好了

1
2
3
4
5
6
7
8
- name: "liuliancao-dev-mails"
  email_configs:
  - to: "liuliancao@liuliancao.com"
    send_resolved: true
  - to: "lqx@liuliancao.com"
    send_resolved: true
  webhook_configs:
  - url: blog.liuliancao.com/send

告警rules

rules配置

这里以consul是否up为例, 其他例子请参考awesome-prometheus-rules

1
2
3
4
5
6
7
yum -y install consul_exporter
systemctl start consul_exporter && systemctl enable consul_exporter
# prometheus.yml追加job
  - job_name: "consul"
    static_configs:
      - targets: ["localhost:9107"]
curl localhost:9107/metrics|grep -i consul

告警媒介

媒介测试

所有的媒介可以在这里看到 alertmanager媒介列表 配置完了alertmanager可能不知道是否生效,比较好的办法是直接调用api 官方github有alertmanager example 这里可以直接运行哈,一般建议运行9093的test就好了

aliyun企业邮集成

配置供参考

 1
 2
 3
 4
 5
 6
 7
 8
 9
10
11
global:
  smtp_smarthost: 'smtp.qiye.aliyun.com:465'
  smtp_from: 'lqx@liuliancao.com'
  smtp_require_tls: false
  smtp_auth_username: 'lqx@liuliancao.com'
  smtp_auth_password: 'blog.liuliancao.com'
# 中间的routes自己写哈,检查通过promtool检查好了
receivers:
- name: "liuliancao-dev-mails"
  email_configs:
  - to: "lqx@liuliancao.com"

最终发现能收到邮件了哈 [[../images/alertmanager01.png ]]

dingTalk集成
 1
 2
 3
 4
 5
 6
 7
 8
 9
10
11
12
13
14
15
16
17
18
19
20
21
22
23
24
25
26
27
28
29
30
31
32
33
34
35
36
37
38
39
40
41
42
43
44
45
46
47
48
49
50
51
52
53
54
55
56
cd /tmp
wget https://ghproxy.com/https://github.com/timonwong/prometheus-webhook-dingtalk/releases/download/v2.0.0/prometheus-webhook-dingtalk-2.0.0.linux-amd64.tar.gz
tar xf prometheus-webhook-dingtalk-2.0.0.linux-amd64.tar.gz
cd prometheus-webhook-dingtalk-2.0.0.linux-amd64

cp  prometheus-webhook-dingtalk /usr/local/bin/
# edit something about config.yml like
## Request timeout
# timeout: 5s

## Uncomment following line in order to write template from scratch (be careful!)
#no_builtin_template: true

## Customizable templates path
#templates:
#  - contrib/templates/legacy/template.tmpl

## You can also override default template using `default_message`
## The following example to use the 'legacy' template from v0.3.0
#default_message:
#  title: '{{ template "legacy.title" . }}'
#  text: '{{ template "legacy.content" . }}'

## Targets, previously was known as "profiles"
targets:
  cf-ops-test:
    url: https://oapi.dingtalk.com/robot/send?access_token=xxx
    # secret for signature
    secret: xxx
  webhook_legacy:
    url: https://oapi.dingtalk.com/robot/send?access_token=xxxxxxxxxxxx
    # Customize template content
    message:
      # Use legacy template
      title: '{{ template "legacy.title" . }}'
      text: '{{ template "legacy.content" . }}'
  webhook_mention_all:
    url: https://oapi.dingtalk.com/robot/send?access_token=xxxxxxxxxxxx
    mention:
      all: true
  webhook_mention_users:
    url: https://oapi.dingtalk.com/robot/send?access_token=xxxxxxxxxxxx
    mention:
      mobiles: ['156xxxx8827', '189xxxx8325']
cat <<EOF >/etc/systemd/system/alertmanager-dingtalk.service
[Unit]
Description = Prometheus node exporter with machine statistics

[Service]
ExecStart = /usr/local/bin/prometheus-webhook-dingtalk --config.file=config.yml

[Install]
WantedBy = multi-user.target

EOF
systemctl daemon-reload && systemctl enable alertmanager-dingtalk && systemctl start alertmanager-dingtalk

可能会觉得graph的链接有问题,比如是你的主机名,这个时候需要修改prometheus的启动参数,默认在/etc/default/prometheus如果没有直接加在命令行也可以

1
2
3
# cat /etc/default/prometheus
PROMETHEUS_OPTS='--config.file=/etc/prometheus/prometheus.yml --storage.tsdb.path=/var/lib/prometheus/data --web.console.libraries=/usr/share/prometheus/console_libraries\
 --web.console.templates=/usr/share/prometheus/consoles --web.external-url=http://xxxx:9090/'

最终效果是这样的哈 ../images/dingtalk01.png◎ ../images/dingtalk01.png

dingding集成

dingtalk使用起来,常常会丢告警,还是有一些问题,用python实现了一个简单的模块

https://github.com/liuliancao/alertmanager-dingding

需要一个dingding机器人和dingding h5应用,支持dingding单发,webhook群发,告警抑制2h,图表关联等

模板优化

参考官方文档自定义模板 主要注意几个东西哈 $label包含标签相关的内容,比如 $label.alertname $label.instance $label.job $label.member $label.monitor 这个是相对的,具体和metrics相对应 $value是实际metric的值 我们可以针对rule进行自定义description和summary

 1
 2
 3
 4
 5
 6
 7
 8
 9
10
11
12
cat /etc/prometheus/rules/alert-consul.rules
groups:
- name: consul
  rules:
  - alert: 服务器Consul状态监控
    expr: consul_serf_lan_member_status{job="consul"} != 1
    for: 15s
    labels:
      severity: critical
    annotations:
      summary: 服务器{{ $labels.instance }}服务异常
      description: this is description
更高的自定义

标题等相关的内容需要通过进一步了解Go Template和如何进行模板设置来说, 一个操作就是把prometheus重新go build一下,修改对应的default.html, 另一个办法是找是否有对应的参数可以设置,目前我还没找到哈, 大家觉得有必要可以继续深究,有空我可能会补上

rules

用了prometheus发现原来类似zabbix或者云监控的那些告警咋都没了,怎么办呢,其实有很多共享rules的地方 在写的时候要注意下 开头必须是这样的,否则会报没有group的错误, 写完记得check rules一下

1
2
3
4
5
6
promtool check rules prometheus.rules

prometheus.rules: yaml: unmarshal errors:
  line 1: cannot unmarshal !!seq into rulefmt.RuleGroups
prometheus.rules: yaml: unmarshal errors:
  line 1: cannot unmarshal !!seq into rulefmt.ruleGroups

正确的开头

1
2
3
4
5
6
7
cat linux.rules |head -n 5
groups:
- name: linux-rules
  rules:
  - alert: HostOutOfMemory
    expr: node_memory_MemAvailable_bytes / node_memory_MemTotal_bytes * 100 < 10>
    ...

发现还是有个问题,我consul_sd发现的服务存在这样的问题,对应的service是0

up{instance="172.16.27.79:81", job="ecs-monitor", notice="xxx proxy server"} 0 up{instance="172.16.27.80:81", job="ecs-monitor", notice="xxx proxy server"} 0

而对应的node_exporter的service是1,这个很奇怪

up{instance="172.16.27.79:9100", job="ecs-monitor", notice="linux server"} 1 up{instance="172.16.27.80:9100", job="ecs-monitor", notice="linux server"} 1

其实这里要明白一个问题, consul_sd终究是配置了service discovery的地方,所以只是变相把各个服务器的service报到了master上面,

所以看一个服务是否up其实就是server或者client对对应端口是否有访问权限,如果访问不通肯定不行,更别谈metrics

经过检查, 我发现prometheus到对端81端口并不通,开放安全组看下, 还是不行, 发现是不是没有/metrics url导致的

结果用nginx 测试了一下,发现还真是

所以总结下

  • consul自动发现发现的服务需要能访问$INSTANCFE_IP:$SERVICE_PORT/metrics能够被访问, 并且有up = 1这个metrics才行
  • 如果不是这样,就不要用up这个监控项, 可以用 consul_catalog_service_node_healthy配合service_name来检查服务状态

高可用相关

联邦集群

联邦集群的设置, 联邦集群的关系是这个集群会有其它targets的数据

 1
 2
 3
 4
 5
 6
 7
 8
 9
10
11
12
13
14
15
16
17
scrape_configs:
  - job_name: 'federate'
    scrape_interval: 15s

    honor_labels: true
    metrics_path: '/federate'

    params:
      'match[]':
        - '{job="prometheus"}'
        - '{__name__=~"job:.*"}'

    static_configs:
      - targets:
        - 'source-prometheus-1:9090'
        - 'source-prometheus-2:9090'
        - 'source-prometheus-3:9090'

如果服务无法启动,可以通过journalcel -xe或者journalctl -u prometheus查看,最终结果就是targets里面有我们对应的federate了

可以发现,是从别的prometheus服务器获取信息,那么

  • 可以做备份
  • 可以做区域-网关的结构,一个prometheus去多个prometheus获取,这样可以均衡metrics的压力

联邦集群是一种冗余方式,只要互相配置联邦集群,数据保存在本地也是可以

多写数据库

1
2
3
4
5
6
remote_write:
  - url: "http://localhost:8086/api/v1/prom/write?db=proms1"
  - url: "http://172.16.27.85:8086/api/v1/prom/write?db=proms1"
remote_read:
  - url: "http://localhost:8086/api/v1/prom/read?db=proms1"
  - url: "http://172.16.27.85:8086/api/v1/prom/read?db=proms1"

这样的弊端是滚动需要数据库进行设置,且可能存在丢数据的情况

实际监控项目

网络

监控ping和拨测延迟
smokeping

https://github.com/SuperQ/smokeping_prober

https://grafana.com/grafana/dashboards/11335

blackbox

blackbox.yml

 1
 2
 3
 4
 5
 6
 7
 8
 9
10
11
12
13
14
15
16
17
18
19
20
21
22
23
24
25
26
27
28
29
30
31
32
33
34
35
36
37
38
39
40
41
42
43
44
modules:
  http_2xx:
    prober: http
  http_post_2xx:
    prober: http
    http:
      method: POST
  tcp_connect:
    prober: tcp
  pop3s_banner:
    prober: tcp
    tcp:
      query_response:
      - expect: "^+OK"
      tls: true
      tls_config:
        insecure_skip_verify: false
  grpc:
    prober: grpc
    grpc:
      tls: true
      preferred_ip_protocol: "ip4"
  grpc_plain:
    prober: grpc
    grpc:
      tls: false
      service: "service1"
  ssh_banner:
    prober: tcp
    tcp:
      query_response:
      - expect: "^SSH-2.0-"
      - send: "SSH-2.0-blackbox-ssh-check"
  irc_banner:
    prober: tcp
    tcp:
      query_response:
      - send: "NICK prober"
      - send: "USER prober prober prober :prober"
      - expect: "PING :([^ ]+)"
        send: "PONG ${1}"
      - expect: "^:[^ ]+ 001"
  icmp:
    prober: icmp

test.json

1
2
3
4
5
6
7
8
[
  {
    "targets": ["xxx","xxx","xxx"],
    "labels": {
        "group": "yyy"
    }
  }
]
双向tracert

一个定时任务,把双向tracert信息吐到elasticsearch

 1
 2
 3
 4
 5
 6
 7
 8
 9
10
11
12
13
14
15
16
17
18
19
20
21
22
23
24
25
26
27
28
29
30
31
32
33
34
35
36
37
38
39
40
41
#!/usr/bin/env bash 
# used for probe mtr in linux by lqx at 2022-07-04.
#
# PROBE_TYPE:
# default
# tcp
# udp
# PROBE_HOST:
# IP
# IP:PORT

while getopts h:p:t:s:k:r: OPTION
do
    case $OPTION in
        p)PROBE_TYPE=$OPTARG;;
        h)PROBE_HOST=$OPTARG;;
	k)PROBE_PORT=$OPTARG;;
        t)PROBE_TIMEOUT=$OPTARG;;
	s)ES_SERVER=$OPTARG;;
	r)REGION=$OPTARG;;
        ?)echo "use bash $0 -p PROBE_TYPE -h PROBE_HOST -t PROBE_TIMEOUT -k PROBE_PORT -s ES_SERVER -r REGION" && exit 1;;
    esac
done
[[ -z $PROBE_HOST ]] && echo use bash $0 -p PROBE_TYPE -h PROBE_HOST -t PROBE_TIMEOUT -k PROBE_PORT -s UPLOAD_SERVER -h PROBE_HOST cannot be null ! && exit 2
[[ -z $PROBE_TYPE ]] && PROBE_TYPE="default"
[[ -z $PROBE_PORT ]] && PROBE_PORT=0

if [[ $PROBE_TYPE == "default" ]];then
    traceroute_out=$(timeout $PROBE_TIMEOUT traceroute $PROBE_HOST)
elif [[ $PROBE_TYPE == "tcp" ]];then
    traceroute_out=$(timeout $PROBE_TIMEOUT traceroute -T $PROBE_HOST -p $PROBE_PORT)
elif [[ $PROBE_TYPE == "udp" ]];then
    traceroute_out=$(timeout $PROBE_TIMEOUT traceroute -U $PROBE_HOST -p $PROBE_PORT)
else
    echo unsupport probe type $PROBE_TYPE && exit 3
fi
traceroute_result=$(echo $traceroute_out|sed 's/\n/ /g')

cat <<EOF | curl -XPOST -H "Content-Type: application/json" --data-binary @- $ES_SERVER/traceroute-statistics/doc
{"region": "$REGION","traceroute": "$traceroute_result", "protocol": "$PROBE_TYPE", "host": "$PROBE_HOST", "port": "$PROBE_PORT"}
EOF

中间件

logstash
 1
 2
 3
 4
 5
 6
 7
 8
 9
10
11
12
13
14
15
16
17
18
cd /usr/local/bin
wget https://ghproxy.com/https://github.com/alxrem/prometheus-logstash-exporter/releases/download/0.7.0/prometheus-logstash-exporter_0.7.0_linux_amd64
chmod u+x prometheus-logstash-exporter/releases/download/0.7.0/prometheus-logstash-exporter_0.7.0_linux_amd64
cat <<EOF >/etc/systemd/system/logstash-exporter.service 
[Unit]
Description=Prometheus logstash exporter not offical
Documentation=https://github.com/alxrem/prometheus-logstash-exporter
After=network-online.target
[Service]
Type=simple
ExecStart=/usr/local/bin/prometheus-logstash-exporter_0.7.0_linux_amd64 -logstash.host localhost -logstash.port 9600
Restart=always
RestartSecs=30s
[Install]
WantedBy=multi-user.target
EOF
systemctl daemon-reload && systemctl start logstash-exporter
systemctl status logstash-exporter

grafana dashboard https://grafana.com/grafana/dashboards/12707

puppet(>=5.0)固化

 1
 2
 3
 4
 5
 6
 7
 8
 9
10
11
12
13
14
15
16
17
18
19
20
21
22
23
24
25
26
27
28
29
30
31
32
33
34
35
36
37
38
39
40
# logstash_exporter.pp
define logstash_exporter_init($port,) {
  notify { "port is $port.": }
  $exporter_port = $port - 9600 + 9304
  file { "/etc/systemd/system/logstash_exporter_${port}.service":
    content => template("prometheus/logstash_exporter/logstash_exporter.service.erb"),
    ensure => file,
    mode => '0644',
    notify => Class['systemd::daemon_reload'],
  }

  service { "logstash_exporter_${port}":
    ensure => running,
    hasrestart => true,
    hasstatus => true,
    subscribe => [Class['systemd::daemon_reload'], File['/usr/local/bin/logstash_exporter']],
  }
}

class prometheus::logstash_exporter($ports=[9600], ) { 
  include systemd::daemon_reload
  file { "/usr/local/bin/logstash_exporter":
    source => "puppet:///modules/prometheus/logstash_exporter/prometheus-logstash-exporter_0.7.0_linux_amd64",
    ensure => file,
    purge => true,
    mode => '0700',
  }
  each($ports) |$value| {  
    logstash_exporter_init{ "logstash-$value":
       port => $value 
    }
  }
}

# 引用
node 'logstash-server01' {
  class { 'prometheus::logstash_exporter':
    ports => [9600, 9602],
  }
}
elasticsearch

elasticsearch_exporter https://github.com/prometheus-community/elasticsearch_exporter 要注意修改下默认的service文件

1
2
# cat /etc/default/elasticsearch_exporter 
ELASTICSEARCH_EXPORTER_OPTS="--es.uri=http://xxx.xxx.xxx.xxx:9200 --es.all --es.cluster_settings --es.indices"

然后在https://grafana.com/grafana/dashboards/?search=elastic 页面搜索elasticsearch,找到合适的进行导入即可

缺少哪些在github里面添加对应的参数即可

如果不出现instances和集群等图表,图表一直是空的话,记得检查下elasticsearch_exporter的参数

grafana相关

更多请看下面链接,没有prometheus ui的可以了解一下grafana 8.x以后的unified alerts Grafana

列出所有标签的值

grafana https://grafana.com/docs/grafana/latest/datasources/prometheus/#templated-queries

label_values(metric, label)

关闭告警

http://xxx:9093/#/alerts 一般来说有告警的话,会有

但是matcher可能无从下手,请参考文档https://prometheus.io/docs/alerting/latest/configuration/#matcher

比较常用的是 alertname 和rule里面的name一致 instance 和你的告警模板一致

web集成

夜莺的测试和使用

docker安装参考https://developer.aliyun.com/mirror/docker-ce?spm=a2c6h.13651102.0.0.3e221b115bonZp

夜莺安装参考文档 https://n9e.github.io/docs/install/compose/

github位置https://github.com/ccfos/nightingale

docker-compose up -d我报错了

1
2
3
root@master0:/home/liuliancao/nightingale/docker# docker-compose up -d
ERROR: The Compose file './docker-compose.yaml' is invalid because:
Unsupported config option for services.mysql: 'platform'

我直接platform注释掉了

最终就正常启动了,具体端口如下

 1
 2
 3
 4
 5
 6
 7
 8
 9
10
11
12
13
14
root@master0:/home/liuliancao/nightingale/docker# netstat -tnlp
Active Internet connections (only servers)
Proto Recv-Q Send-Q Local Address           Foreign Address         State       PID/Program name    
tcp        0      0 0.0.0.0:20090           0.0.0.0:*               LISTEN      8301/docker-proxy   
tcp        0      0 0.0.0.0:9090            0.0.0.0:*               LISTEN      7995/docker-proxy   
tcp        0      0 0.0.0.0:10090           0.0.0.0:*               LISTEN      8318/docker-proxy   
tcp        0      0 0.0.0.0:3306            0.0.0.0:*               LISTEN      8007/docker-proxy   
tcp        0      0 0.0.0.0:6379            0.0.0.0:*               LISTEN      7973/docker-proxy   
tcp        0      0 0.0.0.0:9100            0.0.0.0:*               LISTEN      8811/docker-proxy   
tcp        0      0 0.0.0.0:18000           0.0.0.0:*               LISTEN      8561/docker-proxy   
tcp        0      0 0.0.0.0:22              0.0.0.0:*               LISTEN      325/sshd: /usr/sbin 
tcp        0      0 127.0.0.1:39351         0.0.0.0:*               LISTEN      5350/containerd     
tcp        0      0 0.0.0.0:19000           0.0.0.0:*               LISTEN      8533/docker-proxy   
tcp6       0      0 :::22                   :::*                    LISTEN      325/sshd: /usr/sbin

服务启动之后,浏览器访问nwebapi的端口,即18000,默认用户是root,密码是 root.2020

../images/nightnale.png◎ ../images/nightnale.png

还是集成了不少功能的,比如如果用prometheus,可以不用alertmanager部分, 个人对代码即配置比较感兴趣,这里并不是很方便。web方便做的还是挺好的, 有对应的大盘等,这个我是准备自己开发。

kafka

mysql

https://github.com/prometheus/mysqld_exporter

1
2
CREATE USER 'exporter'@'localhost' IDENTIFIED BY 'XXXXXXXX' WITH MAX_USER_CONNECTIONS 3;
GRANT PROCESS, REPLICATION CLIENT, SELECT ON *.* TO 'exporter'@'localhost';

注意.my.cnf要设置好密码用户名等

1
2
3
4
5
[root@test ~]# cat /var/lib/prometheus/.my.cnf
[client]
  host = localhost
  user = exporter
  password = xxx

注意多实例不是在.my.cnf配置的 直接在prometheus job配置即可 参考官方的 github https://github.com/prometheus/mysqld_exporter

 1
 2
 3
 4
 5
 6
 7
 8
 9
10
11
12
13
14
15
16
17
- job_name: mysql # To get metrics about the mysql exporter’s targets
  params:
    # Not required. Will match value to child in config file. Default value is `client`.
    auth_module: client.servers
  static_configs:
    - targets:
      # All mysql hostnames to monitor.
      - server1:3306
      - server2:3306
  relabel_configs:
    - source_labels: [__address__]
      target_label: __param_target
    - source_labels: [__param_target]
      target_label: instance
    - target_label: __address__
      # The mysqld_exporter host:port
      replacement: localhost:9104

还有一种思路如果是云上的,可以导入grafana云监控插件(各个云一般都支持), 然后接入他们的metrics

mha监控,部分部署了mha manager,这个时候需要监控下这个进程,检查 node_exporter实现比较麻烦,发现process_exporter支持

 1
 2
 3
 4
 5
 6
 7
 8
 9
10
11
yum install process_exporter
[root@abc~]# cat /etc/prometheus/process_exporter.yml
process_names:
- name: "{{.Comm}}"
  name: "{{.Matches}}"
  cmdline:
  - 'masterha_manager'
systemctl restart process_exporter
验证
curl localhost:9256/metrics|grep -i namedprocess_namegroup_num_procs
namedprocess_namegroup_num_procs{groupname="map[:masterha_manager]"} 1

mongodb

https://github.com/raffis/mongodb-query-exporter

1
2
3
4
5
6
7
8
db.getSiblingDB("admin").createUser({
    user: "mongodb_exporter",
    pwd: "password",
    roles: [
        { role: "clusterMonitor", db: "admin" },
        { role: "read", db: "local" }
    ]
})

redis

ntp time

关于ntp监控,我建议监控2个指标

指标1: ntpd是否正常 node_exporter开启此参数 –collector.ntp 表达式 node_scrape_collector_success{collector="ntp"} != 1

指标2: ntpd是否同步正常 表达式 node_timex_sync_status != 1

如果对于时间差异比较敏感一方面可以调整ntp.conf增加maxpoll设置 设置为2 的4次方到14次方之间

或者添加ntpdate相关的crontab任务 定期同步

relabel config

比如node_exporter去掉指定端口

1
2
3
4
5
6
7
8
9
  - job_name: 'node_all'
    file_sd_configs:
    - files:
      - '/etc/prometheus/inventory/node.json'
    relabel_configs:
    - source_labels: [ __address__ ]
      target_label: instance
      regex: '(.*):9100'
      replacement: '${1}'

预测

predict_linar holt_winters 不过这个没看到哪里有写怎么用

默认保存天数是15d,建议改成更多的天数方便查看

/etc/default/prometheus添加即可

1
--storage.tsdb.retention.time=180d

metrics编写go版本

建议阅读官方文档和github的源码 https://pkg.go.dev/github.com/prometheus/client_golang/prometheus#Collector

几个exporter的代码都可以借鉴一下 https://github.com/treydock/ssh_exporter/blob/master/collector/collector.go https://github.com/Lusitaniae/apache_exporter/blob/master/collector/collector.go

建议使用collect的方法。

collect.go

 1
 2
 3
 4
 5
 6
 7
 8
 9
10
11
12
13
14
15
16
17
18
19
20
21
22
23
24
25
26
27
28
29
30
31
32
33
34
35
36
37
38
39
40
41
42
43
44
45
46
47
48
49
50
51
52
53
54
55
56
57
58
59
60
61
62
63
64
65
66
67
68
69
70
71
  package collector

  import (
	  "fmt"
	  "github.com/prometheus/client_golang/prometheus"
	  "log"
  )


  type Exporter struct {
	  host       string
	  secret_key string
	  access_key string

	  version   *prometheus.Desc
	  total     *prometheus.GaugeVec
	  available *prometheus.GaugeVec
	  logger    log.Logger
  }

  type Config struct {
	  host       string
	  access_key string
	  secret_key string
	  app_key    string
  }

  func NewExporter(logger log.Logger, config *Config) *Exporter {
	  return &Exporter{
		  host:       config.host,
		  access_key: config.access_key,
		  secret_key: config.secret_key,
		  logger:     logger,
		  version: prometheus.NewDesc(
			  prometheus.BuildFQName(namespace, "", "version"),
			  "yuanjing exporter version",
			  nil,
			  nil),
		  total: prometheus.NewGaugeVec(
			  prometheus.GaugeOpts{
				  Namespace: namespace,
				  Name:      "total",
				  Help:      "instance total",
			  },
			  []string{"region_id", "instance_id"},
		  ),
		  available: prometheus.NewGaugeVec(
			  prometheus.GaugeOpts{
				  Namespace: namespace,
				  Name:      "available",
				  Help:      "instance available",
			  },
			  []string{"region_id", "instance_id"},
		  ),
	  }
  }

  func (e *Exporter) Describe(ch chan<- *prometheus.Desc) {
	  ch <- e.version
	  e.total.Describe(ch)
	  e.available.Describe(ch)
  }

  func (e *Exporter) Collect(ch chan<- prometheus.Metric) {
	  ch <- prometheus.MustNewConstMetric(e.version, prometheus.GaugeValue, 0.8)

	  // e.total.Collect(ch)
	  // e.available.Collect(ch)
	  e.total.With(prometheus.Labels{"region_id": row.InstanceRegionId, "instance_id": row.InstanceId}).Set(float64(row.InstanceTotal))
	  e.available.With(prometheus.Labels{"region_id": row.InstanceRegionId, "instance_id": row.InstanceId}).Set(float64(row.InstanceAvailableTotal))
  }

exporter.go

 1
 2
 3
 4
 5
 6
 7
 8
 9
10
11
12
13
14
15
16
17
18
19
20
21
22
23
24
25
26
27
28
29
30
31
32
33
34
35
36
37
38
39
40
package main

import (
	"fmt"
	"github.com/prometheus/client_golang/prometheus"
	"github.com/prometheus/client_golang/prometheus/promhttp"
	"github.com/prometheus/common/version"
	"log"
	"net/http"
	"xxx_exporter/collector"
)

const indexContent = `<html>
             <head><title> Exporter</title></head>
             <body>
             <h1>Exporter</h1>
             <p><a href='` + "/metrics" + `'>Metrics</a></p>
             </body>
             </html>`

func init() {
	prometheus.MustRegister(version.NewCollector("exporter"))
}

func main() {
	config := &collector.Config{
	}

	var logger log.Logger
	exporter := collector.NewExporter(logger, config)
	prometheus.MustRegister(exporter)

	// Serve metrics
	http.Handle("/metrics", promhttp.Handler())
	http.HandleFunc("/", func(w http.ResponseWriter, r *http.Request) {
		w.Write([]byte(indexContent))
	})

	log.Fatal(http.ListenAndServe(fmt.Sprintf("%s", ":8182"), nil))
}